January 31

Upcoming MOQI & SIG Free Webinars

If you have an hour to spare, some really awesome topics are being presented in Learning Spaces & Instructional Technology Special Interest Group (SIG) and Minnesota Online Quality Initiative (MOQI) webinars. It is very easy to register, so just try out one of the topics of your interest and I am sure you will be back for more. 🙂

Click here to browse the events and register.

Below you will see webinars happening this February. Plus, don’t forget, a one-day virtual conference STAR Symposium will be held on February 10,  2017 (Register here for STAR Symposium).

December 28

SIG Spring 2017 Free Webinars on D2L Brightspace & Teaching, Learning, and Technology

Just a reminder, the Special Interest Group: Learning Spaces and Instructional Technology (SIG) and Minnesota Online Quality Initiative (MOQI) webinars start in less than two weeks.  These are FREE and open to anyone.  Below you will find the scheduled webinars for spring semester. Tuesday’s webinars will focus in D2L Brightspace. Wednesday’s webinar will focus more on teaching, learning, and technology. Only Wednesday webinars will be recorded and can be found on the MOQI website three weeks after the session is held: https://minnesota.qualitymatters.org/video-resources/.

Click here to register for the sessions described below.

sig_spring2017


October 26

Setting The Tone In A Brightspace Course With QM Standard One

Photo credit: www.brightspace.com

Photo credit: www.brightspace.com

Yesterday at noon D2L hosted a webinar on using QM™ Standard One in your D2L Brightspace course to set the tone. Three instructional designers from University of Maryland College shared their experience and best practices.

The webinar team has provided a link for viewing the webcast at any time. Click here to access the recording!

September 22

D2L Brightspace eLearning Webinars

Mark your calendars! Every Tuesday, starting next week, D2L Brighspace experts and users will share their stories on various topics, ranging from accessibility, to gamifying your course, to Quality Matters.

Below is the list of upcoming webinars (click here to register):

  • Sep 27, 3:00 PM ET : York Technical College and Accessibility: The How and the Why of It
  • Oct 4, 3:00 PM ET : Jazzing Up Online Assessments
  • Oct 11, 3:00 PM ET : Maximizing Brightspace Tools to Create a Gamified Online Learning Environment
  • Oct 18, 3:00 PM ET : What’s Your Story(line)? Developing Engaging Learning Experiences by Extending the Content Tool
  • Oct 25, 1:00 PM ET : Setting The Tone In A Brightspace Course With QM Standard One


However, you can always explore past webinars as well, since there is pool of recorded webinars on D2L Brighspace Resources page.
d2l-resource-library
September 20

Inserting Media in D2L Brightspace’s HTML Editor

There are plenty of options when you work in your course to create a file and edit it in the HTML editor. When you go to a specific content module you have created in your course, for example Week 1 (under Materials > Content > “Week 1”) you get the Upload /Create button. By clicking on it you get several options, where the second option is commonly used to upload your syllabi or any other file, and then the third option is Create a File. Once you click on Create a file you get a window, as shown below,  that is the HTML editor with myriads of editing options that make it easy to work in right from D2l Brightspace. The first tool, called “Insert Stuff” (marked red on the picture below) is how you insert media to your new file. Further below is a list of inserting media options with descriptions.

html-editorInsert a media file from your computer

  1. Click the a859_htmleditor_insert_stuff.jpg Insert Stuff icon.
  2. Select a944_htmleditor_mycomputer My Computer to browse and select a file from your computer.
  3. After you select a file, click Choose Destination to select and create a storage location for the file.
  4. Click Upload.
  5. Click Insert.

Insert a media file from your course offering files

  1. Click the a859_htmleditor_insert_stuff.jpg Insert Stuff icon.
  2. Click a944_course_offering_file_icon.gif Course Offering Files to browse and select a file from your computer.
  3. Select your file from the file directory and click a946_upload Upload to upload a file to the directory. You can also select a file type from the Media Type drop-down list and click Apply to filter your directory search.
  4. After you choose a file, click Next.
  5. Type a Link Text and an Alternate Text.
  6. Click Insert.

Insert a media file from Learning Repository

  1. Click the a859_htmleditor_insert_stuff.jpg Insert Stuff icon.
  2. Click a946_lor_navbar_icon Learning Repository to browse available learning object repositories for objects and assets.
  3. Select your file from the repository and click Next.
  4. Enter a Link Text and an Alternate Text. If you text is decorative, you can select the This is decorative checkbox to avoid entering alternative text. Select Start playing automatically if you want your media file to play as soon as the content item opens.
  5. Click Insert.

Create and insert from My Media

Note: St. Cloud State D2L Brightspace has the My Media integration with Kaltura Mediaspace. Once you click on it, you are able to Add New Webcam Recording or Upload Media from your Mediaspace library.

  1. Click the a859_htmleditor_insert_stuff.jpg Insert Stuff icon.
  2. Click My Media. Click Add New > Webcam Recording.
  3. Click Allow if the Flash player prompts you to allow camera and microphone access.
  4. Click Record and record your video. Click Stop when you finish recording.
  5. You can click Play to preview your video notes.
  6. If you want to re-record, click Clear. If you are satisfied with your recording, click Next.
  7. Enter a Title and an Description of your videos.
  8. Click Next.
  9. You can preview the video notes before you insert it.
  10. Click Insert.

Insert a YouTube video

  1. Click the a859_htmleditor_insert_stuff.jpg Insert Stuff icon.
  2. Click a946_htmleditor_insertstuff_youtube YouTube to browse and select a video you want to insert.
  3. Click Next. You can preview the YouTube video from the YouTube Properties page.
  4. Click Insert.

Insert a URL link

  1. Click the a859_htmleditor_insert_stuff.jpg Insert Stuff icon.
  2. Click a946_htmleditor_insertstuff_insertlink Insert Link to insert the URL for an online media file.
  3. Enter the URL in the URL field and click Next.
  4. Click Insert.

Enter Embed Code

  1. Paste the embed code you have previously copied from your Mediaspace Kaltura.
  2. Click next then insert.

Films on Demand

  1. Click on Films on Demand and Search by Keyword
  2. Once you have found the movie you wanted, click Embed
  3. Finally, click Insert.
August 9

5 WAYS TO SAVE TIME WITH RESPONDUS 4.0

Respondus 4.0 News can be found here.

Instructors use Respondus 4.0 because it saves them time preparing online tests. Lots of time. Here are just five ways Respondus 4.0 accomplishes that.

1. Import Wizard
The feature with the greatest time-saving potential is the Import Wizard. Questions for an entire exam can be imported with Respondus 4.0 in minutes. For example, an exam already in MS Word format can be imported with images, equations, tables, and most types of formatting. This article explains how it works: Importing Questions from MS Word with Respondus 4

2. Respondus Test Bank Network
Publisher test banks typically include thousands of questions for a textbook, but using the questions to create online exams can be cumbersome — unless you use Respondus 4.0. Over 25 of the leading textbook publishers in higher education make their test banks available from the Respondus Test Bank Network. These ready-to-use questions make creating an online exam a breeze with Respondus 4.0. Learn more by watching this video: Using Publisher Test Banks with Respondus 4.0

3. Publish Wizard
The Publish Wizard is part of the “magic” of Respondus 4.0. Once an exam is created, it takes less than a minute to publish an assessment to one or more courses in a Learning Management System. When an institution has a campus-wide license, administrators can input “preconfigured server settings” so instructors only have to enter their user name and password for the LMS. This video shows how it can be set up: Using Preconfigured Server Settings

4. Moving Exams Between Learning Systems
Respondus 4.0 makes it easy to move exams from one learning system to another. This is useful when more than one LMS is used at an institution, or when an instructor moves to an institution using a different learning system.  Simply “retrieve” the original exam using Respondus 4.0 and then “publish” it to the new system. The entire process takes just a few minutes, as shown in this video: Moving Assessments Between Two Learning Systems

5. Working Offline
Sure, you usually have access to an Internet connection. But when you don’t, it’s nice to be able to get work done with Respondus 4.0 because most tasks can be done offline. The client-based interface for Respondus 4.0 is also faster than web-based applications because you don’t have to wait for web pages to load.

A few minutes here, a few hours there … it all adds up to tremendous time savings with Respondus 4.0. You won’t find a faster way to create online test.

(This post taken from Respondus.com Blog.)
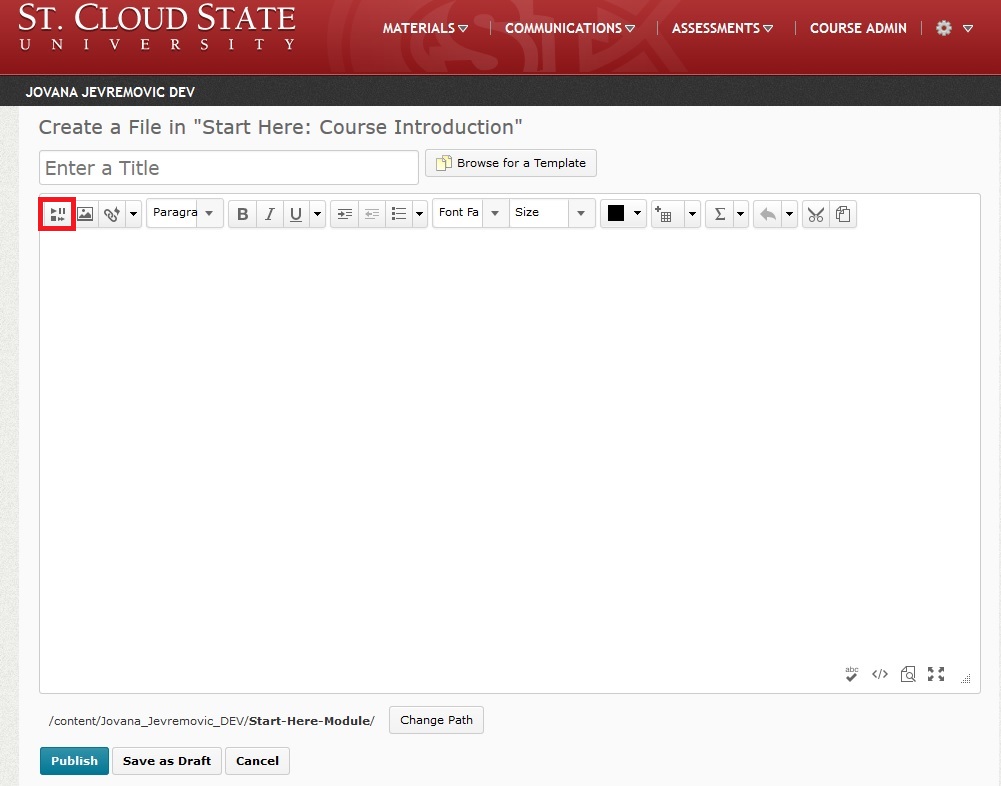
August 1

Brightspace Binder

This week, a new feature appeared for our students in D2L Brightspace. It is a learning tool called Binder, and it unifies essential functions today’s students need: it places all course materials in one place, they can reach them from any device (lap top, tablet, phone) online and offline, they can highlight the documents and study directly from the app.

Here is a brief overview:

  • For our SCSU students, it appears directly on the course content page (there is a button “Send to Binder”)
  • It is a one step process to create a Binder account and it is linked to their D2L Brightspace
  • It allows for 2 GB of space
  • It supports a variety of document types
  • They can sort and filter documents
  • They can create annotations and mark up the documents

D2L Binder2

D2L Binder


June 22

Respondus Assessment Tool

Respondus is a powerful tool for creating and managing exams that can be printed to paper or published directly to D2L Brightspace. Exams are created offline directly in the software, then quickly uploaded to your specific D2L course. This time-saver tool is available to St. Cloud State faculty, so if you wish to use it let us know and we will instal it and give you a quick tutorial on how to use it.

Here, I will list the major features and provide 5 minute video tutorials for creating your quizzes and publishing them to your D2L course.

Authoring Features

  • Create exams and assessments offline using a Windows interface
  • Supports up to 15 question types, including calculated and algorithmic formats
  • Import questions from MS Word (including embedded images), rich-text, QTI, and tab/comma delimited formats
  • Access to thousands of Respondus-compatible publisher test banks – FREE to instructors who adopt a participating textbook

Preview, Publish and Printing Features

  • Preview questions before publishing them to D2L
  • Publish exams and assessments directly to an online course (media files are automatically uploaded)
  • Determine point values and exam settings offline
  • Print exams/surveys directly from Respondus, or save files to MS Word or rich-text format

Retrieval and Reporting Features

  • Retrieve exams from the leading learning platforms, complete with media files*
  • Retrieve custom reports, such as student scores, summary statistics, and answer distributions*
  • Download answer databases for quizzes or surveys and save them in an Excel-compatible format*
  • Archive and restore exam/survey projects (including media content) with one click — ideal for providing a colleague with a ready-to-use exam