The Outlook Social Connector lets you see profiles and updates for people that send you email. The connector is available as a download for earlier versions of Outlook, but with Outlook 2013 it is included out of the box. I have found the using the Outlook Social Connector for LinkedIn to be very valuable, and it think it will be for you too. Even if you are not an avid user of LinkedIn and you don’t have many connections, this connector will pull information from anyone out there with a public profile (which is most folks). Let’s say that you get an email from a vendor or someone you met at a conference. You kind of remember talking to them, but you’re not totally sure. With the Outlook Social Connector connected to LinkedIn, now you can see their picture. And if you are like me you often forget names, but having a picture can help connect the dots. Ok, let’s take a look.
First things first. Getting the Outlook Social Connector connected.
- Open Outlook 2013 and click on the File menu in the top left corner.

- The Info tab will open by default and at the top you’ll see an Account Settings box. Click that.

- In the pop-up you’ll see an option for Social Network Accounts. Click that.

- Select LinkedIn and provide you username and password. And you’re all set!

Now that you have it connected let’s look at some of the features.
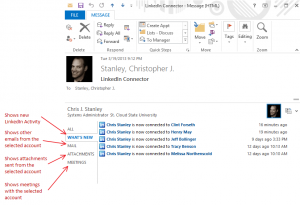
- The most obvious change will be the appearance of pictures for contacts that send you emails. If you open an email that the connector is able to find a LinkedIn profile for you’ll also see additional information in the bottom pane of the email message (known as the People Pane), including their recent activity on LinkedIn. If there are multiple recipients as a part of the email, you will be able to look at the other contacts also.

- While exploring the People Pane you’ll be able to expand it by clicking the arrow on the right hand side. This will expose addition tabs including What’s New, Mail, Attachments, and Meetings. These can all come in handy when you are trying to look back at your previous communication with the contact.
- There are several other places within the Outlook interface that you’ll notice the LinkedIn content (i.e. under Contacts), but the last one I will point out in the post is the users Contact Card. If you right-click the name of the contact you’ll get a set of basic information. On the lower right you’ll see a small arrow allowing you to open the Contact Card for the user. Once open you’ll notice the What’s New section that reflects the same information we saw in the What’s New section in step 2.

I hope you find this connector as valuable as I do!
For more information on what’s new in Outlook 2013 I found this site helpful: http://www.howto-outlook.com/faq/outlook2013newandchanged.htm

