September 20

Inserting Media in D2L Brightspace’s HTML Editor

There are plenty of options when you work in your course to create a file and edit it in the HTML editor. When you go to a specific content module you have created in your course, for example Week 1 (under Materials > Content > “Week 1”) you get the Upload /Create button. By clicking on it you get several options, where the second option is commonly used to upload your syllabi or any other file, and then the third option is Create a File. Once you click on Create a file you get a window, as shown below,  that is the HTML editor with myriads of editing options that make it easy to work in right from D2l Brightspace. The first tool, called “Insert Stuff” (marked red on the picture below) is how you insert media to your new file. Further below is a list of inserting media options with descriptions.
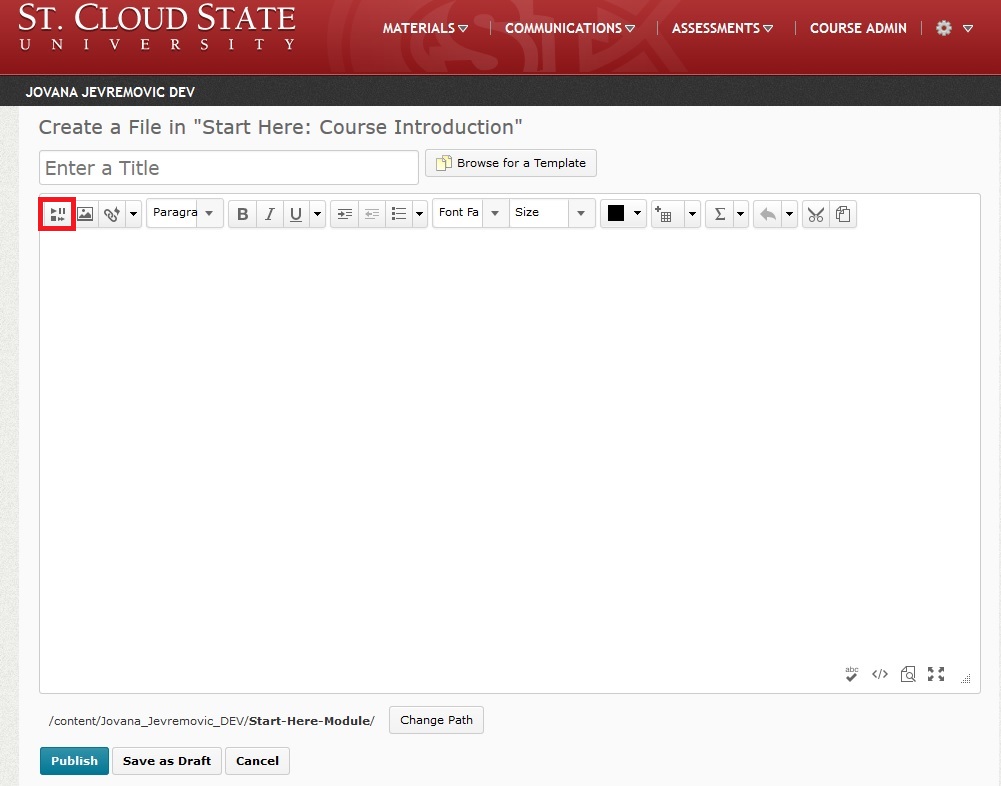
html-editorInsert a media file from your computer

  1. Click the a859_htmleditor_insert_stuff.jpg Insert Stuff icon.
  2. Select a944_htmleditor_mycomputer My Computer to browse and select a file from your computer.
  3. After you select a file, click Choose Destination to select and create a storage location for the file.
  4. Click Upload.
  5. Click Insert.

Insert a media file from your course offering files

  1. Click the a859_htmleditor_insert_stuff.jpg Insert Stuff icon.
  2. Click a944_course_offering_file_icon.gif Course Offering Files to browse and select a file from your computer.
  3. Select your file from the file directory and click a946_upload Upload to upload a file to the directory. You can also select a file type from the Media Type drop-down list and click Apply to filter your directory search.
  4. After you choose a file, click Next.
  5. Type a Link Text and an Alternate Text.
  6. Click Insert.

Insert a media file from Learning Repository

  1. Click the a859_htmleditor_insert_stuff.jpg Insert Stuff icon.
  2. Click a946_lor_navbar_icon Learning Repository to browse available learning object repositories for objects and assets.
  3. Select your file from the repository and click Next.
  4. Enter a Link Text and an Alternate Text. If you text is decorative, you can select the This is decorative checkbox to avoid entering alternative text. Select Start playing automatically if you want your media file to play as soon as the content item opens.
  5. Click Insert.

Create and insert from My Media

Note: St. Cloud State D2L Brightspace has the My Media integration with Kaltura Mediaspace. Once you click on it, you are able to Add New Webcam Recording or Upload Media from your Mediaspace library.

  1. Click the a859_htmleditor_insert_stuff.jpg Insert Stuff icon.
  2. Click My Media. Click Add New > Webcam Recording.
  3. Click Allow if the Flash player prompts you to allow camera and microphone access.
  4. Click Record and record your video. Click Stop when you finish recording.
  5. You can click Play to preview your video notes.
  6. If you want to re-record, click Clear. If you are satisfied with your recording, click Next.
  7. Enter a Title and an Description of your videos.
  8. Click Next.
  9. You can preview the video notes before you insert it.
  10. Click Insert.

Insert a YouTube video

  1. Click the a859_htmleditor_insert_stuff.jpg Insert Stuff icon.
  2. Click a946_htmleditor_insertstuff_youtube YouTube to browse and select a video you want to insert.
  3. Click Next. You can preview the YouTube video from the YouTube Properties page.
  4. Click Insert.

Insert a URL link

  1. Click the a859_htmleditor_insert_stuff.jpg Insert Stuff icon.
  2. Click a946_htmleditor_insertstuff_insertlink Insert Link to insert the URL for an online media file.
  3. Enter the URL in the URL field and click Next.
  4. Click Insert.

Enter Embed Code

  1. Paste the embed code you have previously copied from your Mediaspace Kaltura.
  2. Click next then insert.

Films on Demand

  1. Click on Films on Demand and Search by Keyword
  2. Once you have found the movie you wanted, click Embed
  3. Finally, click Insert.
June 9

MediaSpace to D2L Brightspace: Step by Step Instructions

MediaspaceMediaspace is a nifty solution for using multimedia in your in class or online courses. It is very easy to put stuff from your media to D2L. You simply log in (here) with your star ID and password.

Many faculty members get frustrated with putting up an audio Power Point in their D2L course. The issues are: students cannot view them while in D2L, they have to download the PPT first. Then, many faculty do not want their PPTs downloaded so they would just upload the PDF version of their PPT to their course. This way, the idea of having a voice over Power Point is lost, and you have to settle with what works best for you.

However, using Screen Recording tool in Mediaspace Kaltura enables you to select the specific area on your screen  to record and use the mic along the way. You can record your Power Point and have the audio with it, then just upload it in your D2L course. The cool thing about it – students can view it (and hear the audio) straight from the course and cannot download it.

Bellow are step-by-step instructions of how to do a Webcam Recording or Screen Recording and then embed the video in a Content Module. For additional help and FAQs click here.

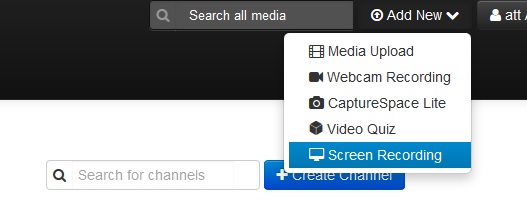
  1. Once you log in, you will see your name in the upper right corner. Next to it, to the left, you will see Add New, with the drop down menu. You can select Screen Recording or Webcam Recording (as you can see there are 3 more options, but I will cover the basic two now).Mediaspace Screen Recording tool
  2. Once you click, you will be prompted to Launch the Screen Recorder or if it is just a video – you will be asked to “Record from Webcam” where you click “Allow Camera and Microphone Access”  on the screen. Mediaspace Screen Recording launchMediaspace Record from Webcam
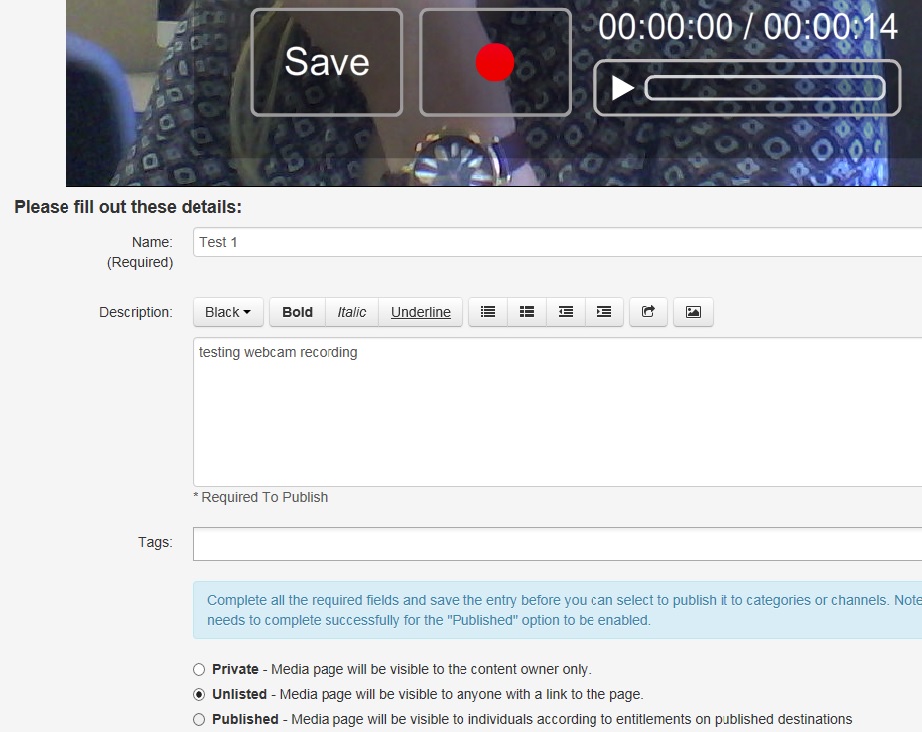
  3. Next, you start recording.  In Screen recording you control the pause button and once you are ready, click done. In Webcam recording, you just click anywhere to start recording and then click anywhere on the screen to stop recording. You will see a box with “Save” appear on the screen. Mediaspace Webcam recording save
  4. It is very important to Save on the screen, as that is how the video is uploaded to your media. Then, Name the video. You can also add a Description for your students.
  5. The most important thing is to always save it as Unlisted! Why – if it is Private, you will not be able to share it with anyone. If it is Published, anyone can see it right away. Therefore, always click Unlisted and then click on the blue save button below. Once it is saved, you get the option Go to Media.
  6. You will click Go to Media and it will take you to the newly recorded video/screen capture. From there, you will click Share. You want to be able to get the embed code and share it with your students in your D2L Brightspace course shell. Have your D2L course open in a new tab/new window next to it. Once you click Embed, you will get an embed code in a window and all you need to do is copy it (right click or ctrl-c).Mediaspace Webcam recording embed code
  7. Now that you have copied the embed code, open your D2L course. In Materials > Content > (any selected) Module > New > Create a File.Mediaspace Webcam recording embed to D2L 1
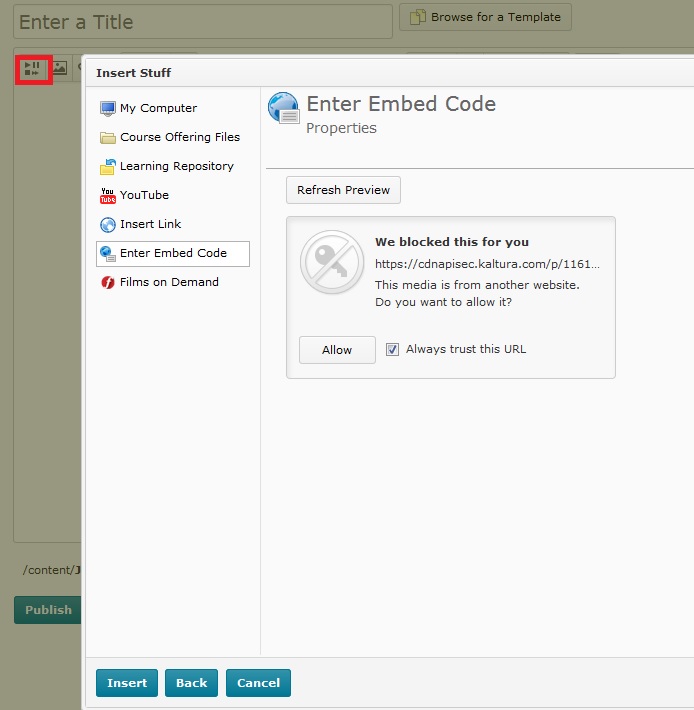
  8.  Once you click Create a File:  Enter a Title > (**Below the Title box there are options: The first icon in the upper left corner says  Insert Stuff**) > Click Insert Stuff > Enter Embed Code > Paste!!! what you copied in Mediaspace – your embed code > Next >  Allow > Insert. Voila, you have inserted the video in your D2L content page. Don’t forget to publish the newly created file.Mediaspace Webcam recording embed to D2L 2

We hope this post can help you navigate these resources. Again, if you have any trouble getting through the steps, we are here to help! Contact us here, by email att@stcloudstate.edu or just walk in to Miller Center 118.

May 17

Creating Video Content Topic in D2L

MnSCU D2L Brightspace Service Desk

Having a variety of instructional materials is encouraged in your classes. It is easy to put videos on topics related to your class in your D2L Brightspace course shell. Here is a reminder how to do it (Click here for the full post with pictures).
Instructors can create a HTML content topic and insert an embedded video, or create a Quicklink content topic to a video URL.
Video topics are listed in modules with a RNT/assets/images/a1594_video_file_icon.jpg Video icon to distinguish them from other types of files and link topics.
– To create a video content topic, click New in a content module, then select Video or Audio from the drop-down menu.
– Two options: Upload: You can create your video using Mediaspace where you would use the embed code.
Web Video or Audio: paste URL in the field and after the video loads click save.

ADDITIONAL INFORMATION
Note: Any web video can be used to create a video topic simply by pasting its HTML embed code in the Enter URL or Embed Code field. Additionally, D2L Brightspace provides shortcuts for some web sites, enabling users to create videos by simply copying and pasting the URL of the video instead of the HTML embed code.

The following table lists supported sites that were selected based on the most frequently used videos by D2L Brightspace clients today.

 Video Source  URL Support  Embed Code Support  Extract Title Support  Extract Author Support
 YouTube  Yes  Yes  Yes  Yes
 Vimeo  Yes  Yes  Yes  Yes
 D2L Capture*  No**  Yes  No  No
 Dailymotion  Yes  Yes  Yes  No
 Discovery  No  Yes  Yes  No
 Howcast  Yes  Yes  Yes  No
 Influxis  No  Yes  No  No
 Khan Academy  No  Yes  Yes  Yes
 MIT  Yes  Yes  Yes  No
 National Geographic  Yes  Yes  Yes  No
 SchoolTube  Yes  Yes  Yes***  No
 ScienceStage  No  Yes  Yes  No
 ScreenCast  No  Yes  No  No
 TeacherTube  Yes  Yes  No  No
 TED  Yes  Yes  Yes  No
 Adobe TV  No  Yes  No  No
November 16

D2L Brightspace upgrade tomorrow

Brightspace_logo_Stacked_RGB_300x275D2L Brightspace is going to be upgraded to version 10.5.3 on Tuesday the 17th from 4:00am to 8:00am. So, whats new?

Here is our another D2L tip of the month or FAQ of the week, brought to you by MnSCU D2L Brightspace Service Desk.

Q:  What’s new in D2L Brightspace version 10.5.3 for students, teachers and campus site administrators?

A:  There are three FAQs to highlight the major changes for the update from version 10.5.0 to version 10.5.3.

What’s New for Students?   https://d2l.custhelp.com/app/answers/detail/a_id/1627

What’s New for Teachers?   https://d2l.custhelp.com/app/answers/detail/a_id/1628

What’s New for Admins?      https://d2l.custhelp.com/app/answers/detail/a_id/1629


November 12

D2L and MnSCU Collaboration Conference: 2016 MN IGNITE

Brightspace_logo_Stacked_RGB_300x275MnSCU and Brightspace by D2L invite you to join them at the annual MN IGNITE 2016 conference on April 15, 2016, from 7:45 AM–3:50 PM (Central Time) at Normandale Community College, 9700 France Ave S, Bloomington, MN. Ignite is your opportunity to connect, exchange feedback, display best practices, and network with other D2L Brightspace users.

Sponsored by D2L in collaboration with Minnesota State Colleges and Universities and St. Catherine University, this conference will showcase many aspects of teaching and learning within the D2L Brightspace Learning Management System. Sessions will also feature related topics such as best practices in instructional design, technology integration and administrative management. A MN Ignite Conference is all about connection and collaboration. With presentations, training sessions, and time for peer networking, attendees can discover how D2L Brightspace—our integrated learning platform—supports every individual’s unique pathway and potential.

Proposals will be accepted after December 1, 2015, from higher education and K-12 faculty and teachers, as well as staff and administrators. If you have a topic you are passionate about, some best practices you want to share with colleagues, or an education program you want to promote, watch for the next e-mail and submit your proposal for sessions that fall into one of these five tracks:
1. Design and Development
2. Delivery and Instruction
3. Analysis and Management
4. Innovation and Engagement
5. Support, Training and Administration

This year’s sessions will be offered in the following formats:
• 50-minute Regular sessions
• 100-minute Extended sessions (may include hands-on activities)
• 30-minute Poster sessions

MN IGNITE AWARDS

Did you develop a bright idea for using D2L Brightspace to enhance your students’ learning experience? Or did your team collaborate on a project to address a student, faculty, or organizational need? If so, we want to hear from you!

Please nominate yourself (or your team) for the third annual MN Ignite 2016 Awards.

The MN Ignite 2016 Awards, given out at the annual MN Ignite 2016 Regional Conference, recognizes educators or those in education who have used D2L Brightspace to deliver learning experiences that are innovative, collaborative, or have made an extraordinary impact on learning outcomes.

More information with links to proposals and awards will be posted soon.

November 5

D2L Q&A – Reset Survey Attempts

MnSCU D2L Brightspace Service Desk

Our team recommends the MnSCU D2L Brightspace Service Desk. You can always find small details you were probably thinking about at some point. Here is another great tip on surveys:

Q: How can an instructor reset an in-progress survey attempt in a D2L Brightspace course?
A: Instructors can reset (i.e. delete) an in-progress attempt from the survey’s Statistics page. Follow instructions here.

October 12

D2L Q&A: Understanding Quiz Question Statistics

MnSCU D2L Brightspace Service DeskHere is another useful tip for instructors on how to get the statistics on their quiz questions.

Q: What statistics are available for quiz questions in a D2L Brightspace course?

A: Learn about quiz statistics and common questions at FAQ #1601.

Below is a brief overview in tables taken from the MnSCU D2L Brightspace Service Desk:

Statistics by Question Type and Question Collection:

Are statistics available for:

Question Type Average Grade Standard Deviation Discrimination Index Point Biserial
T/F Yes Yes Yes Yes*
M/C Yes Yes Yes Yes*
M/S Yes Yes Yes No
Matching Yes Yes Yes No
Ordering Yes Yes Yes No
LA Yes Yes Yes No
SA Yes Yes Yes No
MSA Yes Yes Yes No
FIB Yes Yes Yes No
2+2 Yes Yes Yes No
x10 Yes Yes Yes No

* Note: There can only be one answer worth 100%; all other answers must be worth 0%.

Are statistics available for questions:

Question Condition Average Grade Standard Deviation Discrimination Index Point Biserial
In Random Section** No No No No
In Folder Section Yes Yes Yes Yes
In Root section Yes Yes Yes Yes
Has Randomized Responses Yes Yes Yes Yes

* Note: any questions that are contained in a Random folder DO NOT produce item analysis statistics.