September 20

Inserting Media in D2L Brightspace’s HTML Editor

There are plenty of options when you work in your course to create a file and edit it in the HTML editor. When you go to a specific content module you have created in your course, for example Week 1 (under Materials > Content > “Week 1”) you get the Upload /Create button. By clicking on it you get several options, where the second option is commonly used to upload your syllabi or any other file, and then the third option is Create a File. Once you click on Create a file you get a window, as shown below,  that is the HTML editor with myriads of editing options that make it easy to work in right from D2l Brightspace. The first tool, called “Insert Stuff” (marked red on the picture below) is how you insert media to your new file. Further below is a list of inserting media options with descriptions.
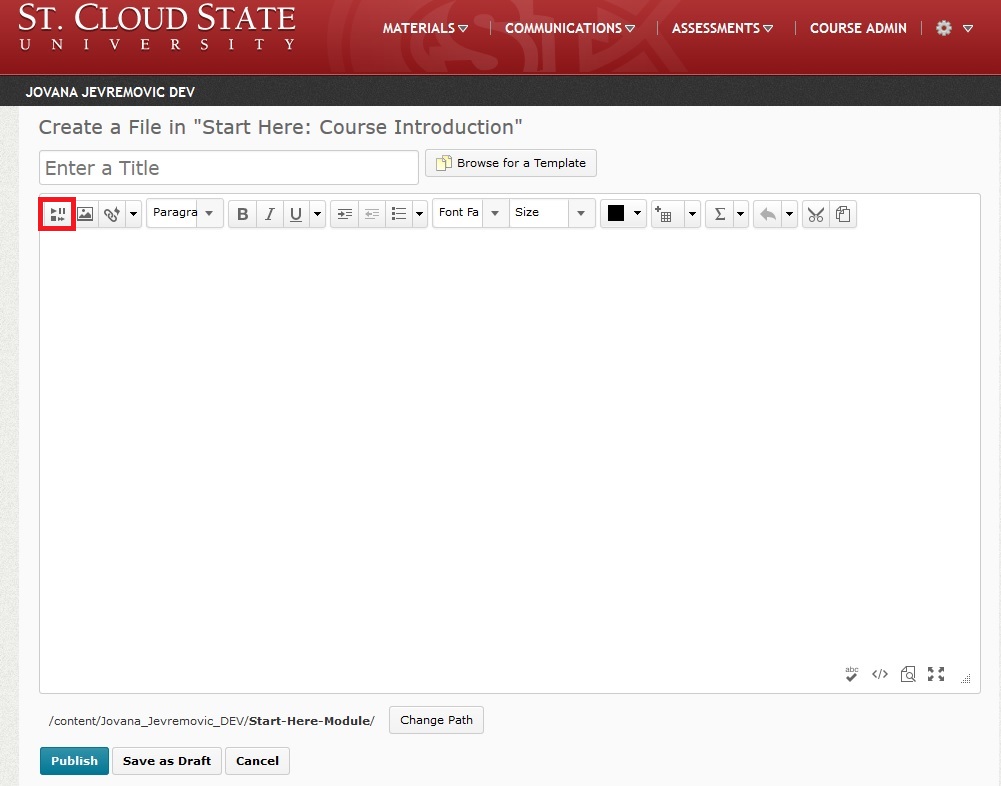
html-editorInsert a media file from your computer

  1. Click the a859_htmleditor_insert_stuff.jpg Insert Stuff icon.
  2. Select a944_htmleditor_mycomputer My Computer to browse and select a file from your computer.
  3. After you select a file, click Choose Destination to select and create a storage location for the file.
  4. Click Upload.
  5. Click Insert.

Insert a media file from your course offering files

  1. Click the a859_htmleditor_insert_stuff.jpg Insert Stuff icon.
  2. Click a944_course_offering_file_icon.gif Course Offering Files to browse and select a file from your computer.
  3. Select your file from the file directory and click a946_upload Upload to upload a file to the directory. You can also select a file type from the Media Type drop-down list and click Apply to filter your directory search.
  4. After you choose a file, click Next.
  5. Type a Link Text and an Alternate Text.
  6. Click Insert.

Insert a media file from Learning Repository

  1. Click the a859_htmleditor_insert_stuff.jpg Insert Stuff icon.
  2. Click a946_lor_navbar_icon Learning Repository to browse available learning object repositories for objects and assets.
  3. Select your file from the repository and click Next.
  4. Enter a Link Text and an Alternate Text. If you text is decorative, you can select the This is decorative checkbox to avoid entering alternative text. Select Start playing automatically if you want your media file to play as soon as the content item opens.
  5. Click Insert.

Create and insert from My Media

Note: St. Cloud State D2L Brightspace has the My Media integration with Kaltura Mediaspace. Once you click on it, you are able to Add New Webcam Recording or Upload Media from your Mediaspace library.

  1. Click the a859_htmleditor_insert_stuff.jpg Insert Stuff icon.
  2. Click My Media. Click Add New > Webcam Recording.
  3. Click Allow if the Flash player prompts you to allow camera and microphone access.
  4. Click Record and record your video. Click Stop when you finish recording.
  5. You can click Play to preview your video notes.
  6. If you want to re-record, click Clear. If you are satisfied with your recording, click Next.
  7. Enter a Title and an Description of your videos.
  8. Click Next.
  9. You can preview the video notes before you insert it.
  10. Click Insert.

Insert a YouTube video

  1. Click the a859_htmleditor_insert_stuff.jpg Insert Stuff icon.
  2. Click a946_htmleditor_insertstuff_youtube YouTube to browse and select a video you want to insert.
  3. Click Next. You can preview the YouTube video from the YouTube Properties page.
  4. Click Insert.

Insert a URL link

  1. Click the a859_htmleditor_insert_stuff.jpg Insert Stuff icon.
  2. Click a946_htmleditor_insertstuff_insertlink Insert Link to insert the URL for an online media file.
  3. Enter the URL in the URL field and click Next.
  4. Click Insert.

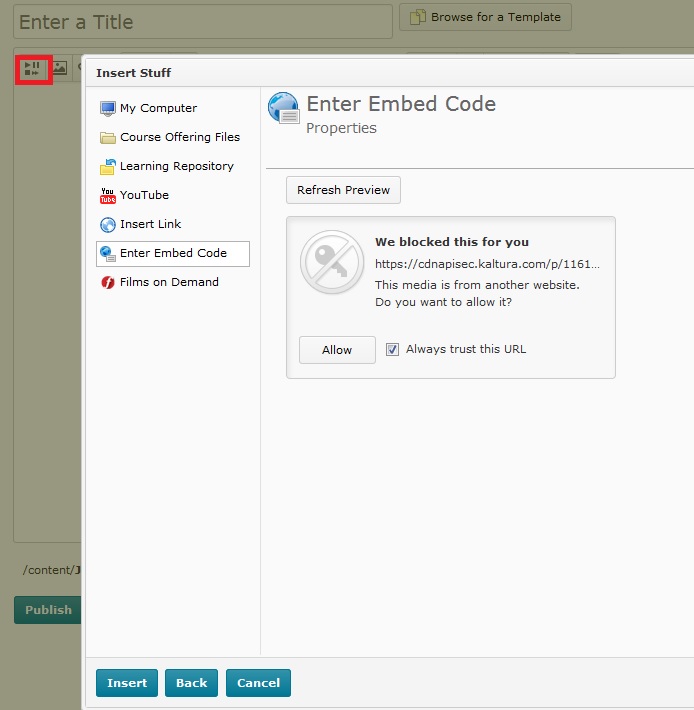
Enter Embed Code

  1. Paste the embed code you have previously copied from your Mediaspace Kaltura.
  2. Click next then insert.

Films on Demand

  1. Click on Films on Demand and Search by Keyword
  2. Once you have found the movie you wanted, click Embed
  3. Finally, click Insert.
August 9

5 WAYS TO SAVE TIME WITH RESPONDUS 4.0

Respondus 4.0 News can be found here.

Instructors use Respondus 4.0 because it saves them time preparing online tests. Lots of time. Here are just five ways Respondus 4.0 accomplishes that.

1. Import Wizard
The feature with the greatest time-saving potential is the Import Wizard. Questions for an entire exam can be imported with Respondus 4.0 in minutes. For example, an exam already in MS Word format can be imported with images, equations, tables, and most types of formatting. This article explains how it works: Importing Questions from MS Word with Respondus 4

2. Respondus Test Bank Network
Publisher test banks typically include thousands of questions for a textbook, but using the questions to create online exams can be cumbersome — unless you use Respondus 4.0. Over 25 of the leading textbook publishers in higher education make their test banks available from the Respondus Test Bank Network. These ready-to-use questions make creating an online exam a breeze with Respondus 4.0. Learn more by watching this video: Using Publisher Test Banks with Respondus 4.0

3. Publish Wizard
The Publish Wizard is part of the “magic” of Respondus 4.0. Once an exam is created, it takes less than a minute to publish an assessment to one or more courses in a Learning Management System. When an institution has a campus-wide license, administrators can input “preconfigured server settings” so instructors only have to enter their user name and password for the LMS. This video shows how it can be set up: Using Preconfigured Server Settings

4. Moving Exams Between Learning Systems
Respondus 4.0 makes it easy to move exams from one learning system to another. This is useful when more than one LMS is used at an institution, or when an instructor moves to an institution using a different learning system.  Simply “retrieve” the original exam using Respondus 4.0 and then “publish” it to the new system. The entire process takes just a few minutes, as shown in this video: Moving Assessments Between Two Learning Systems

5. Working Offline
Sure, you usually have access to an Internet connection. But when you don’t, it’s nice to be able to get work done with Respondus 4.0 because most tasks can be done offline. The client-based interface for Respondus 4.0 is also faster than web-based applications because you don’t have to wait for web pages to load.

A few minutes here, a few hours there … it all adds up to tremendous time savings with Respondus 4.0. You won’t find a faster way to create online test.

(This post taken from Respondus.com Blog.)

August 2

Managing Online Learning: Free Online Courses

IMG_2802FutureLearn and The Open University with partnerships from universities across continents offer a selection of free online courses (with possibilities of gaining certificates too). Here are the five courses listed that can help you understand online learning better – you can recommend it to your students or take a look yourself if interested. Click on each link below to learn more/enroll in the course.

Get Started with Online Learning: This free online course will explain how you can study online without putting the rest of your life on hold.

Learning Online: Learning and Collaborating:Become an effective online learner and develop your online communication skills when working with others.

Learning Online: Managing Your Identity: Reflect on how you want to present yourself online and take positive steps towards these goals.

Learning Online: Reflecting and Sharing: Get the most out of online learning by reflecting and sharing your learning with others.

Learning Online: Searching and Researching: Improve your online research skills and your ability to critically analyze sources of information.

August 1

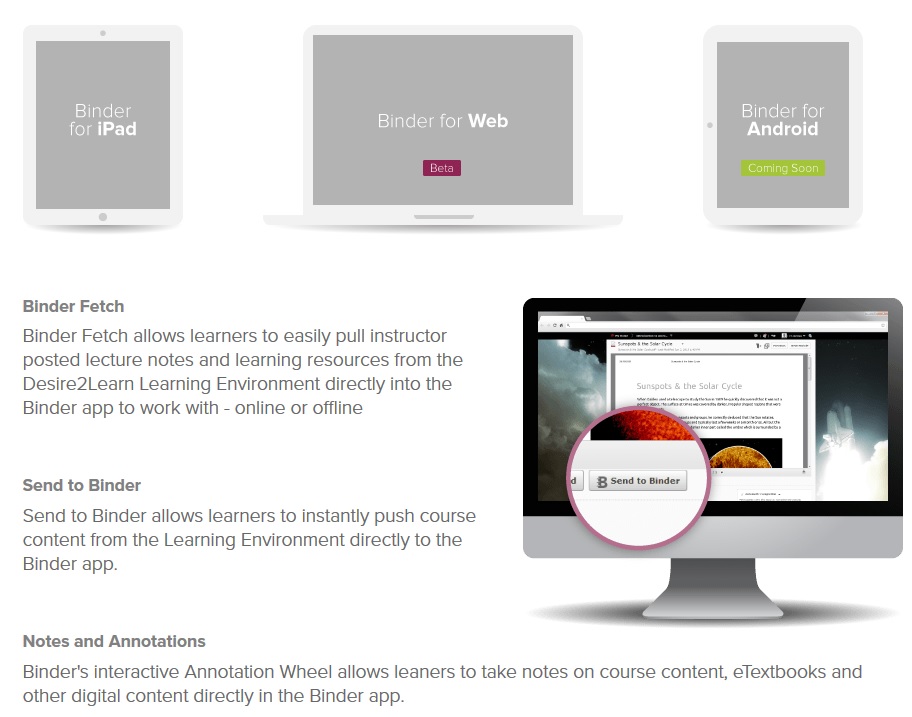
Brightspace Binder

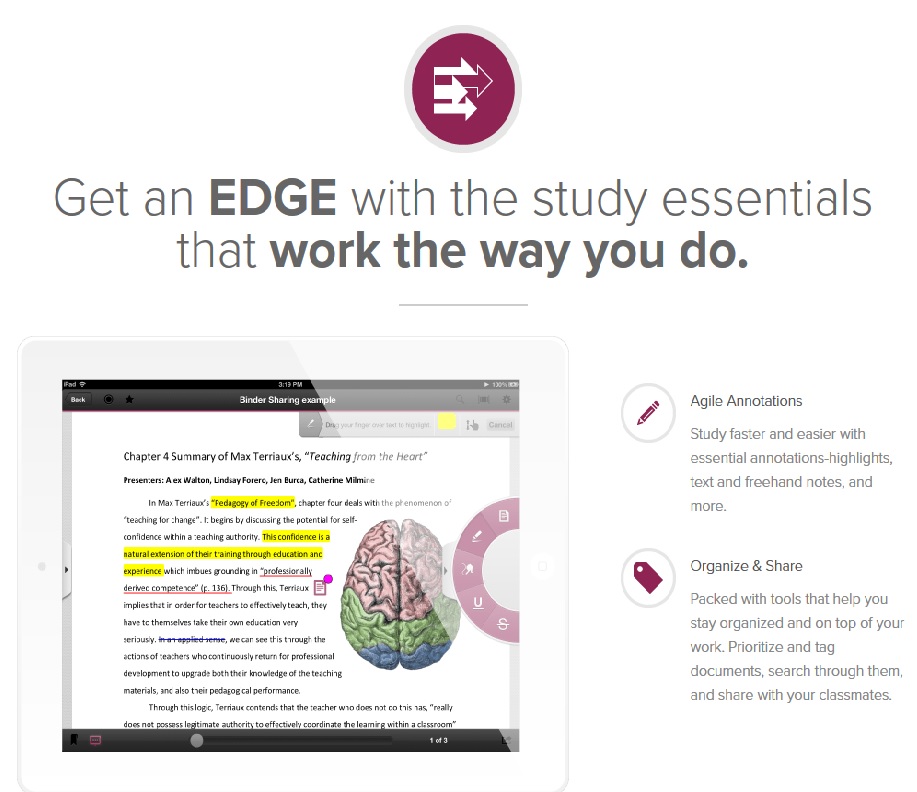
This week, a new feature appeared for our students in D2L Brightspace. It is a learning tool called Binder, and it unifies essential functions today’s students need: it places all course materials in one place, they can reach them from any device (lap top, tablet, phone) online and offline, they can highlight the documents and study directly from the app.

Here is a brief overview:

  • For our SCSU students, it appears directly on the course content page (there is a button “Send to Binder”)
  • It is a one step process to create a Binder account and it is linked to their D2L Brightspace
  • It allows for 2 GB of space
  • It supports a variety of document types
  • They can sort and filter documents
  • They can create annotations and mark up the documents

D2L Binder2

D2L Binder


June 21

D2L Brightspace Terminology Changes Effective August 6, 2016

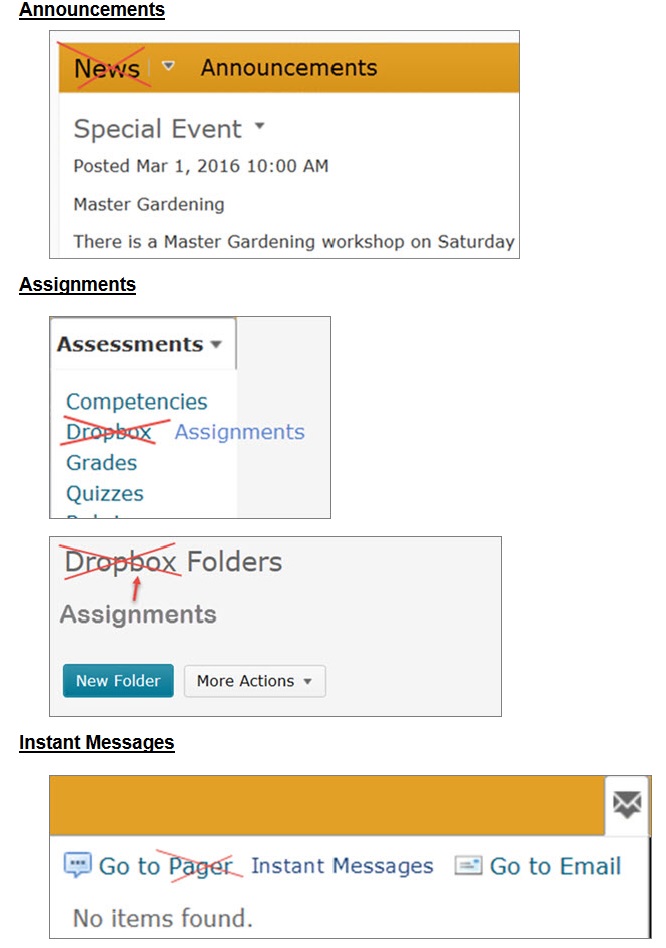
D2L has changed the terminology for some Brightspace tools and features. Take a look at the screenshots of the changes at the bottom of this post.↓

  • These changes will take effect at all MnSCU D2L Brightspace Production sites as of Saturday, August 6, 2016.
  • MnSCU users will see these terminology changes in the learning environment and on D2L’s community site, including online documentation and help.
  • Students and faculty will be made aware of the changes through MnSCU Service Desk FAQs and Announcements (formerly News) at each school’s D2L Brightspace My Home page.
Current

Terminology

New Terminology as

of August 6, 2016

News Announcements
Dropbox Assignments
Edit Course Course Admin
Pager Instant Messages
New (in Content tool) Upload/Create
Add Existing Activities (in Content tool) Existing Activities

D2L will be updating its Brightspace documentation to reflect the terminology changes, and MnSCU will implement the changes to be in sync with D2L’s documentation to help users make a smooth transition.  MnSCU will implement the terminology changes in D2L Brightspace on August 6, 2016.

D2L Terminology Changes Course Admin and ContentD2L Terminology Changes Announcements Assignments Instant Messages

June 15

Educause: 7 Things You Should Know About…™

EDUCAUSE 7 Things You Should Know About …™ is a series of publications that provides concise information about diverse range of professional challenges in higher education IT, from updates on current developments to explorations of important overarching issues. Use these quick reads to get essential information on emerging technologies and related practices, including potential implications and opportunities. Each two-page brief focuses on a single technology or practice and how it relates to higher education.

Here are the seven questions they answer in each publication:

  1. What is it?
  2. How does it work?
  3. Who’s doing it?
  4. Why is it significant?
  5. What are the downsides?
  6. Where is it going?
  7. What are the implications for higher education?

Among the most interesting topics, which you can skim through in less then a minute yet learn a lot, are: Remote Proctoring, One-Button Studio, Institutional Self-Assessment, Universal Design, Games and Learning, Open Educational Resources, E-Books, Podcasting, and many more.

They group the topics into two themes: Campus-Wide IT and Learning Technology Topics (click on each to access the list of publications).

June 9

MediaSpace to D2L Brightspace: Step by Step Instructions

MediaspaceMediaspace is a nifty solution for using multimedia in your in class or online courses. It is very easy to put stuff from your media to D2L. You simply log in (here) with your star ID and password.

Many faculty members get frustrated with putting up an audio Power Point in their D2L course. The issues are: students cannot view them while in D2L, they have to download the PPT first. Then, many faculty do not want their PPTs downloaded so they would just upload the PDF version of their PPT to their course. This way, the idea of having a voice over Power Point is lost, and you have to settle with what works best for you.

However, using Screen Recording tool in Mediaspace Kaltura enables you to select the specific area on your screen  to record and use the mic along the way. You can record your Power Point and have the audio with it, then just upload it in your D2L course. The cool thing about it – students can view it (and hear the audio) straight from the course and cannot download it.

Bellow are step-by-step instructions of how to do a Webcam Recording or Screen Recording and then embed the video in a Content Module. For additional help and FAQs click here.

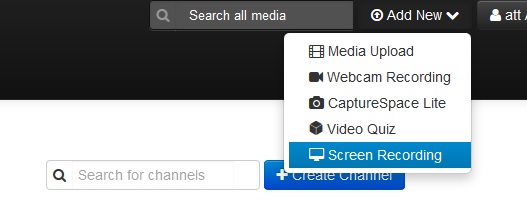
  1. Once you log in, you will see your name in the upper right corner. Next to it, to the left, you will see Add New, with the drop down menu. You can select Screen Recording or Webcam Recording (as you can see there are 3 more options, but I will cover the basic two now).Mediaspace Screen Recording tool
  2. Once you click, you will be prompted to Launch the Screen Recorder or if it is just a video – you will be asked to “Record from Webcam” where you click “Allow Camera and Microphone Access”  on the screen. Mediaspace Screen Recording launchMediaspace Record from Webcam
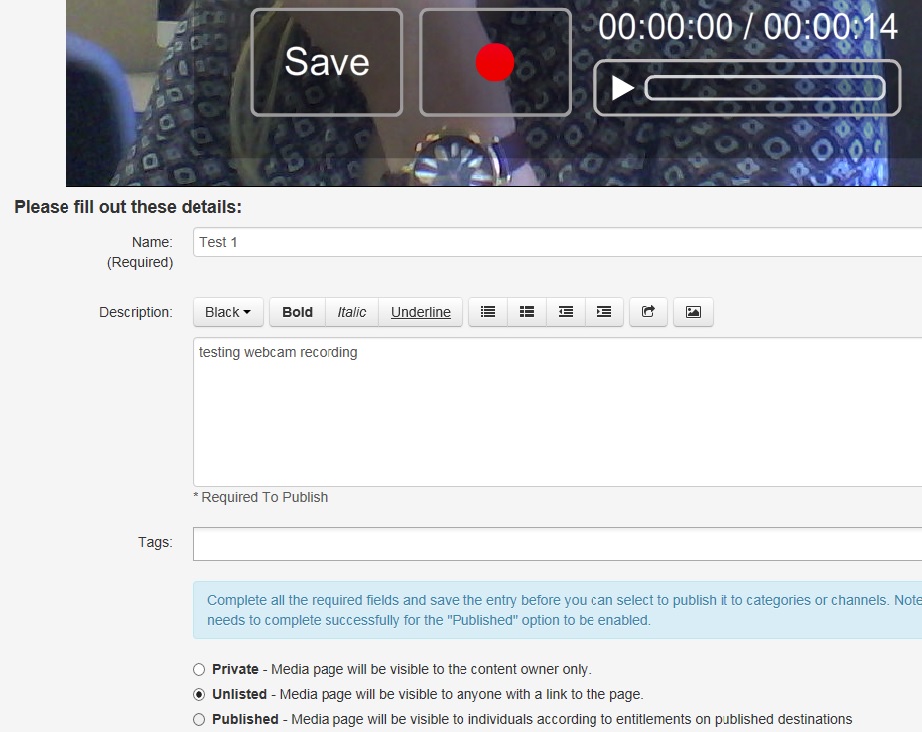
  3. Next, you start recording.  In Screen recording you control the pause button and once you are ready, click done. In Webcam recording, you just click anywhere to start recording and then click anywhere on the screen to stop recording. You will see a box with “Save” appear on the screen. Mediaspace Webcam recording save
  4. It is very important to Save on the screen, as that is how the video is uploaded to your media. Then, Name the video. You can also add a Description for your students.
  5. The most important thing is to always save it as Unlisted! Why – if it is Private, you will not be able to share it with anyone. If it is Published, anyone can see it right away. Therefore, always click Unlisted and then click on the blue save button below. Once it is saved, you get the option Go to Media.
  6. You will click Go to Media and it will take you to the newly recorded video/screen capture. From there, you will click Share. You want to be able to get the embed code and share it with your students in your D2L Brightspace course shell. Have your D2L course open in a new tab/new window next to it. Once you click Embed, you will get an embed code in a window and all you need to do is copy it (right click or ctrl-c).Mediaspace Webcam recording embed code
  7. Now that you have copied the embed code, open your D2L course. In Materials > Content > (any selected) Module > New > Create a File.Mediaspace Webcam recording embed to D2L 1
  8.  Once you click Create a File:  Enter a Title > (**Below the Title box there are options: The first icon in the upper left corner says  Insert Stuff**) > Click Insert Stuff > Enter Embed Code > Paste!!! what you copied in Mediaspace – your embed code > Next >  Allow > Insert. Voila, you have inserted the video in your D2L content page. Don’t forget to publish the newly created file.Mediaspace Webcam recording embed to D2L 2

We hope this post can help you navigate these resources. Again, if you have any trouble getting through the steps, we are here to help! Contact us here, by email att@stcloudstate.edu or just walk in to Miller Center 118.

May 26

Five Mistakes in Online Course Design

Wrong Way in Stop Sign

Almost 5 years ago, Elizabeth St. Germain summarized 5 most common pitfalls of course design when faculty teach online. This story does not get old as we still encounter similar problems with some online classes. You can read her summary if you click on the link above. Here, I will list the five things she described as the things you SHOULD NOT do in an online course:

  1. You should not Upload your course materials, then call it a day (to fix it, you can: Rework that hand-out on tedious lab procedures into a colorful, animated slideshow. Bring a historic context to life through links to period paintings, historic sites, or even contemporary Google street views).
  2. You should not Let the course management system drive your thinking (to fix it, you can: Start by thinking about the kinds of learning experiences you want to create rather than letting the CMS define a more limited view of putting your course online. Then, work with an instructional designer/lead course developer from our team to help you transfer this to D2L).
  3. You should not Insist on being the “sage on the stage” (to fix it: Your course should be a place where students come to participate in the connections that can be made between your subject and the outside world. Build these bridges into your online course materials, and become a facilitator of these important connections).
  4. You should not Expect your students to consume knowledge rather than create it (to fix it: Develop content that asks students to recall and apply what they have learned. In an online course, this could mean peppering your online content with quick test-your-comprehension questions or developing exercises that ask students to generate data, capture and upload photos of evidence, research connections to real-world conditions, or create explanatory slideshows).
  5. You should not Ignore the ways students learn from each other (to fix it, you can: Include assignments that require students to share ideas and resources, present topics to each other, and critique each other’s work. Use online communication tools and collaborative spaces to foster a class-wide web of supportive contact rather than settling into multiple parallel channels between you and each student).
May 20

What Makes an Online Instructional Video Compelling?

Woit_100426_225We encourage the use of different instructional materials for your face-to-face, hybrid, or online courses. Videos are a big part of classes nowadays, but it may be hard to decide on how to integrate videos in your course or how to create professional quality videos of your own.

“With the advent of new technology tools and new online programs, many research questions around instructional media have begun to emerge. For instance, how might student-produced media (through lightweight tools such as cell phones or webcams) influence instruction and social interaction? In hybrid programs, how can video best supplement face-to-face sessions? How do graphic design elements (such as the video thumbnail, a video embedded on a course page, or types of text surrounding a video) influence viewing habits? Online tools and online programs continue to increase, and many opportunities exist for further investigating best practices of online instructional design.”

Here is a full article by Melanie Hibbert for EDUCAUSE Review, and you will find the summary of here findings below. These emerging findings, taken from both quantitative and qualitative data, provide some insight as to what characteristics of online videos students describe as compelling, and what types of videos receive the most views:

  • Strategizing videos to tie directly to course assignments and/or assessment
  • Advising faculty members to use conversational language in production; also encouraging them to use humor and draw on past experiences
  • Adding audio/visual elements to the video that supplement the content; the videos should not convey information that students could just read as text
  • Producing high-quality videos (despite mixed findings related to production values, elements such as professional sound, lighting, and graphics are considered important when creating high-quality media)
  • Keeping the four-minute view time as a design consideration, especially when producing longer-form content lectures that can be broken up into shorter segments

Let us know if you plan to post videos for your course and schedule a consultation for best practices/video help. Stop by our ofice: Academic Technologies Team is here all summer, Miller Center 118.