August 8

Short and Reusable Recordings

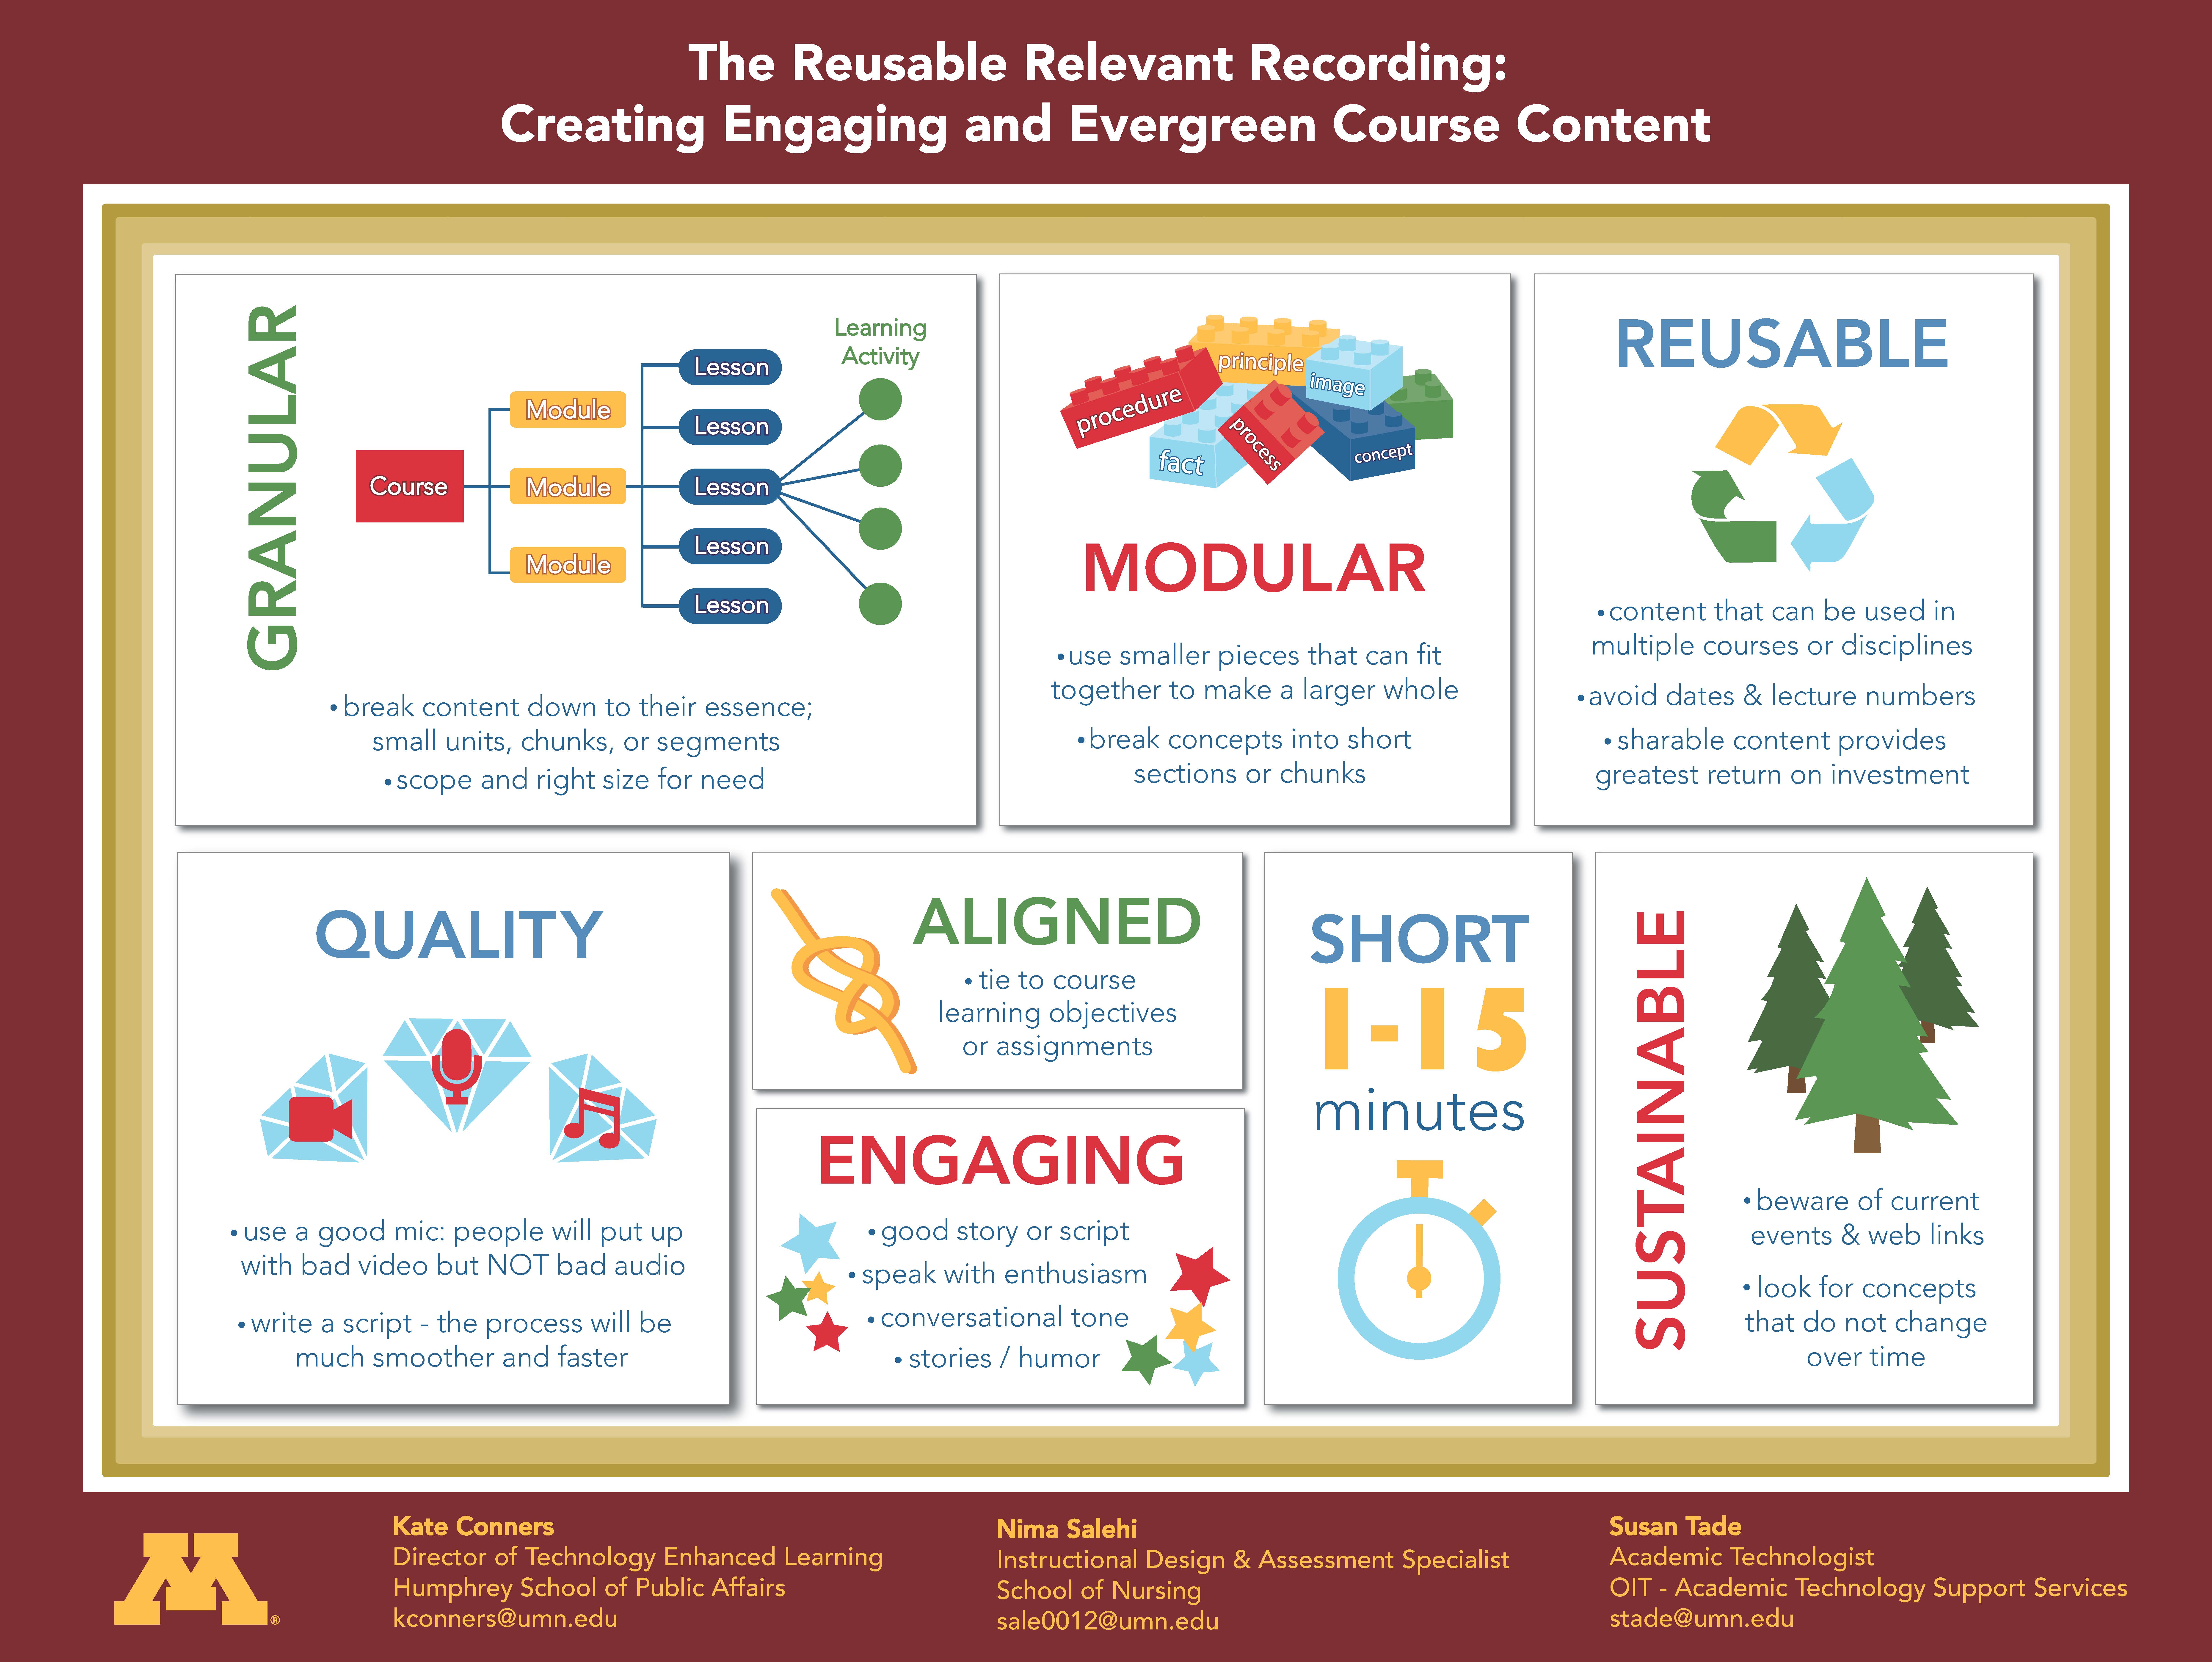
Our colleagues from the U of M presented at the Minnesota E-Learning Summit on using videos in your courses. The handout below summarizes their main points about creating engaging, relevant, sustainable videos. One interesting point they made is that students will rather watch several videos that make up 20 minutes total, than just one 20 minute long video. I guess the “binge watching” culture prevails. 🙂 The Reusable Relevant Recording Creating Engaging and Evergreen Course Content handout: granualr, modular, reusable, quality, aligned, engaging, short (video), sustainable

April 10

10 Tips for Creating Effective Instructional Videos

Michael Smedshammer, faculty instructional design coordinator at Modesto Junior College, wrote for Faculty Focus on creating effective instructional videos. Here is a recap:

  • Forget the headset. If your computer doesn’t have a built-in camera and microphone, buy a webcam that does both.
  • Keep it short. If you have a lot to say (and sometimes we do!), chunk up the message. Make a video mini-series with 5-10 minute chapters.
  • Prepare well and then wing it. Sometimes a brief outline taped next to your webcam is all you need to stay on track without sounding like you’re reading from your notes.
  • Position the camera above your eyes, so you look slightly up at it. Position your head to appear at the top third of the screen so the recording includes your face and most of your torso.
  • Location, location, location. Your work or home office are usually safe choices as a background for the recording.
  • Move it out. Don’t always shoot your videos from the same spot. Your audience will tire of seeing the same background.Keep the backgrounds neutral but varied. Your audience will appreciate it.
  • Look right at the camera lens. Looking anywhere else looks weird. Your audience will think you have an avoidance problem.
  • Cover your screen. Once you get everything ready, consider taping a piece of paper over your computer screen so you’re not distracted by seeing yourself while you record. Remember, you do not need to be perfect! Try not to be overly critical of yourself.
  • Say “cheese.” Smiling helps everything. Whether you’re recording a webcast of your face or just your voice, smiling makes you look and sound better.
  • Avoid over doing it. The wacky music, goofy fade-ins, and spinning transitions that come with some video editing software can make home-videos look corny. Leave most of those tools for the professionals (who don’t really use them either).


March 10

Improving the Quality of Instructional Videos

Richard Rose wrote for Campus Technology on “6 Dimensions for More Effective Online Instructional Videos” (click here to view full text). Here is some of his advice:

1) Sound-to-Silence Balance

Sound-to-silence balance is the ratio of talk to empty space on the soundtrack of your video. Tools like Camtasia and Captivate show the soundtrack as a display of the visible waveforms, which makes it easy to see this balance at a glance without listening to the content itself.

2) Visual Context-to-Detail Balance

Visual context-to-detail balance is the control of how often your video editing tool is zooming in and zooming out. Some video tools, such as Camtasia’s Smart Focus, allow the software to make these decisions for you, based on the movement of your on-screen cursor, but the top-end instructional designer will always want to control location and magnification precisely and, therefore, manually.

3) Feature-to-Application Balance

This is the balance between showing program features in the context of the entire application and giving specific examples of their use. One of end of this continuum is the feature/function/benefit (FFB) approach, popular in the early days of computer software instruction. It could be summarized as, “It has this, which does that, which allows you to achieve this type of task.”

4) Balance Between Framing/Assessment and Substance

The old military training model had three parts:

  1. Tell them what you are going to tell them.
  2. Tell them.
  3. Tell them what you told them.

Today we call this framing and it is supported by David Ausubel’s classic Advance Organizer model. Having a sneak preview graphic at the front-end and a review graphic at the back-end of a step-wise training segment is often a fine idea.

5) Personality Balance

Personality balance is how much of yourself as an individual you choose to express in your instructional video. The ideal tone for most presentations is that of a clearly competent and enthusiastic professional who is visibly excited about the great stuff he or she has to share, and is delighted to be the one who is sharing it. Once this persona is established, the talent gets out of the way and lets the subject matter be the star of the show. But this is not always the right balance, depending on subject and audience
 

June 9

MediaSpace to D2L Brightspace: Step by Step Instructions

MediaspaceMediaspace is a nifty solution for using multimedia in your in class or online courses. It is very easy to put stuff from your media to D2L. You simply log in (here) with your star ID and password.

Many faculty members get frustrated with putting up an audio Power Point in their D2L course. The issues are: students cannot view them while in D2L, they have to download the PPT first. Then, many faculty do not want their PPTs downloaded so they would just upload the PDF version of their PPT to their course. This way, the idea of having a voice over Power Point is lost, and you have to settle with what works best for you.

However, using Screen Recording tool in Mediaspace Kaltura enables you to select the specific area on your screen  to record and use the mic along the way. You can record your Power Point and have the audio with it, then just upload it in your D2L course. The cool thing about it – students can view it (and hear the audio) straight from the course and cannot download it.

Bellow are step-by-step instructions of how to do a Webcam Recording or Screen Recording and then embed the video in a Content Module. For additional help and FAQs click here.

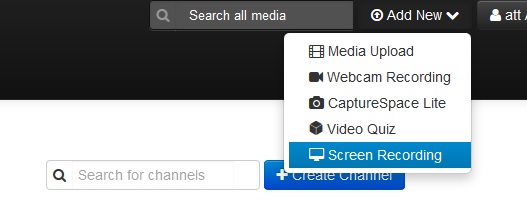
  1. Once you log in, you will see your name in the upper right corner. Next to it, to the left, you will see Add New, with the drop down menu. You can select Screen Recording or Webcam Recording (as you can see there are 3 more options, but I will cover the basic two now).Mediaspace Screen Recording tool
  2. Once you click, you will be prompted to Launch the Screen Recorder or if it is just a video – you will be asked to “Record from Webcam” where you click “Allow Camera and Microphone Access”  on the screen. Mediaspace Screen Recording launchMediaspace Record from Webcam
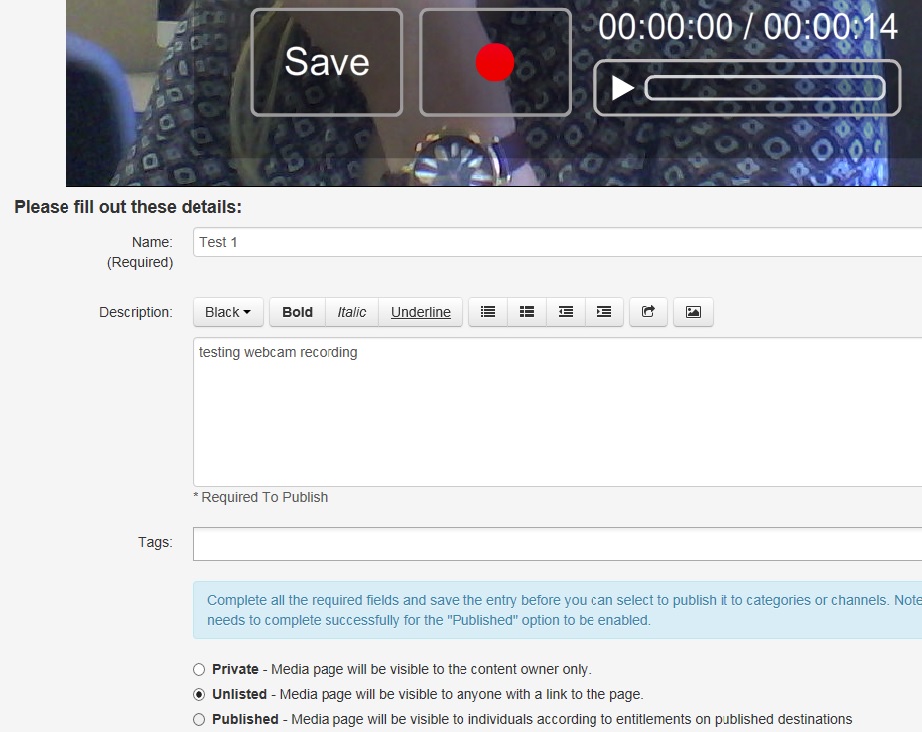
  3. Next, you start recording.  In Screen recording you control the pause button and once you are ready, click done. In Webcam recording, you just click anywhere to start recording and then click anywhere on the screen to stop recording. You will see a box with “Save” appear on the screen. Mediaspace Webcam recording save
  4. It is very important to Save on the screen, as that is how the video is uploaded to your media. Then, Name the video. You can also add a Description for your students.
  5. The most important thing is to always save it as Unlisted! Why – if it is Private, you will not be able to share it with anyone. If it is Published, anyone can see it right away. Therefore, always click Unlisted and then click on the blue save button below. Once it is saved, you get the option Go to Media.
  6. You will click Go to Media and it will take you to the newly recorded video/screen capture. From there, you will click Share. You want to be able to get the embed code and share it with your students in your D2L Brightspace course shell. Have your D2L course open in a new tab/new window next to it. Once you click Embed, you will get an embed code in a window and all you need to do is copy it (right click or ctrl-c).Mediaspace Webcam recording embed code
  7. Now that you have copied the embed code, open your D2L course. In Materials > Content > (any selected) Module > New > Create a File.Mediaspace Webcam recording embed to D2L 1
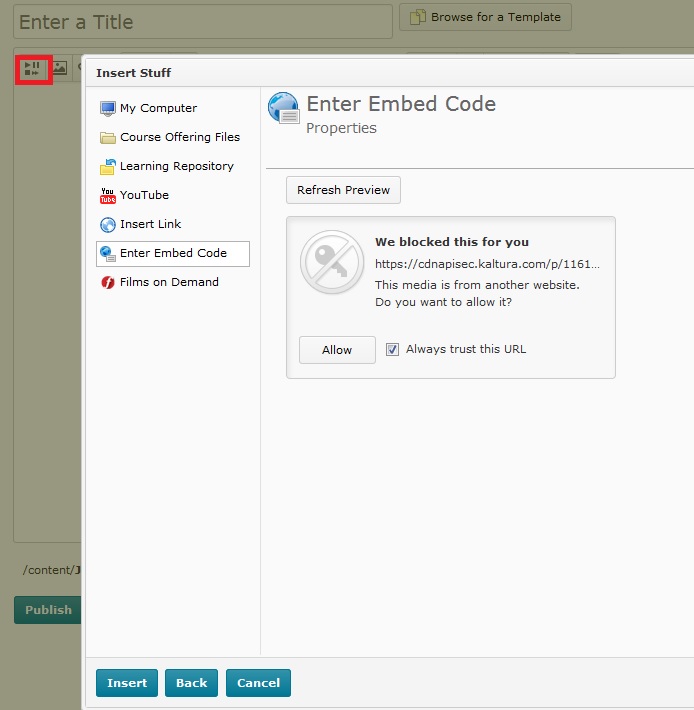
  8.  Once you click Create a File:  Enter a Title > (**Below the Title box there are options: The first icon in the upper left corner says  Insert Stuff**) > Click Insert Stuff > Enter Embed Code > Paste!!! what you copied in Mediaspace – your embed code > Next >  Allow > Insert. Voila, you have inserted the video in your D2L content page. Don’t forget to publish the newly created file.Mediaspace Webcam recording embed to D2L 2

We hope this post can help you navigate these resources. Again, if you have any trouble getting through the steps, we are here to help! Contact us here, by email att@stcloudstate.edu or just walk in to Miller Center 118.

May 20

What Makes an Online Instructional Video Compelling?

Woit_100426_225We encourage the use of different instructional materials for your face-to-face, hybrid, or online courses. Videos are a big part of classes nowadays, but it may be hard to decide on how to integrate videos in your course or how to create professional quality videos of your own.

“With the advent of new technology tools and new online programs, many research questions around instructional media have begun to emerge. For instance, how might student-produced media (through lightweight tools such as cell phones or webcams) influence instruction and social interaction? In hybrid programs, how can video best supplement face-to-face sessions? How do graphic design elements (such as the video thumbnail, a video embedded on a course page, or types of text surrounding a video) influence viewing habits? Online tools and online programs continue to increase, and many opportunities exist for further investigating best practices of online instructional design.”

Here is a full article by Melanie Hibbert for EDUCAUSE Review, and you will find the summary of here findings below. These emerging findings, taken from both quantitative and qualitative data, provide some insight as to what characteristics of online videos students describe as compelling, and what types of videos receive the most views:

  • Strategizing videos to tie directly to course assignments and/or assessment
  • Advising faculty members to use conversational language in production; also encouraging them to use humor and draw on past experiences
  • Adding audio/visual elements to the video that supplement the content; the videos should not convey information that students could just read as text
  • Producing high-quality videos (despite mixed findings related to production values, elements such as professional sound, lighting, and graphics are considered important when creating high-quality media)
  • Keeping the four-minute view time as a design consideration, especially when producing longer-form content lectures that can be broken up into shorter segments

Let us know if you plan to post videos for your course and schedule a consultation for best practices/video help. Stop by our ofice: Academic Technologies Team is here all summer, Miller Center 118.

October 6

Building Community in an Online Course

Woit_081002_223Thursday, October 8 is Fall break for our students. However, Center for Excellence in Teaching and Learning at SCSU organizes the Faculty Workshop Day. This year’s sessions are on student retention and success. Among many excellent presentations that will discuss this year’s topic, online and distance education are certainly a setting to be taken into account.

A member of our Academic Technologies Team, Roseann Wolak, will be holding a session on  Effective Online Teaching – Creating a Sense of Community from 2:15-3:30 pm in Voyageurs North, AMC:

“Sense of Community Theory is based on the work of Seymour Sarason (1974).  Sarason’s research explored community identity and social bonding.  In the online environment, where students are physically separated from one another, the strength of the learning community depends on the extent to which students feel like insiders rather than outsiders.
Faculty play a key role in designing an online learning environment which fosters interactivity, connectedness, and meaningful learning.  This hands-on session will cover instructional design that gets students interacting with one another:  student led discussions, peer review, collaborative research projects, and group presentations.”

Until then, here is an article in the Chronicle of Higher Education that focuses specifically on building community in an online class by doing student video presentations.


September 1

Academic Support Services at SCSU introduce online tutoring service Smarthinking

Attention instructors!

Please refer your students to their D2L/Brightspace home page that will show the academic support services for them or Tutoring Services/Options.

This leads our students to the listing of all SCSU on-campus tutoring services and Smarthinking.

Smarthinking is a 24/7 online and on-demand tutoring service, available at no charge to all enrolled students (each student is assigned 15 hours per semester by default).  They can use Smarthinking to schedule live tutoring appointments, participate in drop-in live sessions, ask questions, or submit writing assignments for feedback.

Students are able to access the Smarthinking website via a link on their D2L/Brightspace main page.

Finally, just below this new resource, remind them that there is a list of free self-registration offerings as well as student help documents and student overview videos for navigating D2L.

D2L help and tutring screenshot