Looking for different ways for students to share their knowledge. I’ve done Jamboard, Google Slides, Discussion posts, padlet…I just want something different and am not able to come up with any great ideas here. Anyone come up with anything else fun or interesting? This is for an asynchronous course.
This is a free event, thanks to our founding conference sponsor: School of Information at San José State University.
ATTENDING: We will send links for attending the conference a day or two before the event.
If you have friends or colleagues that wish to attend, this is a free event and we encourage you to share our information widely. However, please send them to the conference registration page (https://www.library20.com/instructionaldesign) rather than giving them the above link directly as it will allow us to track participation.
What is ID: ID create an environment conductive to students’ success. Thoughtful and applied design. Making faculty and instructors’ life easier. Allow faculty to do what they do best.
Lindsey: solving the instructional problem with the tools at hand.
go-to ed tech? What is the hot tech right now?
Lindsey: H5P (open source) CC – licensed, Moodle, WordPress, build online tutorials for free (Isolde), Norway, well based, VR tours. Will H5P become paid? Michael: cell phones Dana: Emory VoiceThread. From the chat: Articulate365 (pricy), Kahoot, Peardeck, Yellowdig, vidgrid, Adobe Spark, Adobe POst, padlet, Groupme instead of Canvas, Vyond, Coggle, wakelet, Phinx
Suggestions for librarians who want to build ID skills. Dana: connect with the regional community if no ID on campus. Community of practice. Using ID tools, speakers outside of campus. Lindsey: teaching myself what is most interesting to me. what technologies are important. Find a learning community. Michael: repeat the others
keep up to date on ID theory and practices: Dana – ELI, OLC (Online Learning Consortium). ELearning Heroes. Lindsay: corporate word. Michael: POD
the one-shot instruction: what is the approach (q/n from the chat); Dana – ID as a services. person dedicated following up with people requested either ID class or training, open the line of communication. summative evaluation type of activity since we are failing to evaluate how well students absorbed the information. LIndsey: one-shot for basics (e.g. freshman), build scaffold program, reserved the one shot for meeting with librarians, for hands-on. Michael: work with faculty member and rewrite a program, build assessment rather then only deliver
areas of impact: subject matter librarians, working with faculty to use of the library resources, new faculty drawn in info and if not follow up, Canvas support. Michael: librarians and ID working directly with faculty rewriting their curricula, measure it, demonstrating library need, 3000 students – correlation. document the lib contribution to student learning directly, the teaching-learning culture change. using info and data in more authentic ways. Lindsey: disconnect the way librarian teach vs faculty teach. Coordination scaffolding.
q/n from the chat. easily. how can non ID librarian can easily implement ID type:
Lindsey: new to ID? Google. Jargon and Acronyms. re framing how you see ed technology. technology as something to get the job done. no need to get fancy.
Dana: same as Lindsey. But also learning theories and learning outcomes. From ID perspective: what they will come out with by the end of the session. action words.
Michael: mindset. what students want to learn, before what I will teach. backward design – understanding by design. UDL. Grab a friend and talk through.
Tara
ed tech is not getting job done:
clickers for attendance is horrible idea.
I had a really interesting role in grad school where we lived in the land between tech support and pedagogical / design support.
From Rajesh Kumar Das to All panelists and other attendees: (02:38 PM)
Good to hear from mike about affective learning. In this case, could you please focus what kind of technique is approprite for what, i.e. Didactic instruction, a low-complexity teaching technique such as a “Quiz Bowl”, or Jigsaw Method as high-complexity strategy, or both.
From Hailey W. to All panelists and other attendees: (02:36 PM)
As an ID librarian and the campus LMS administrator I struggle with getting them to see that other side of my role. That I’m not just “tech support”. Anyone else? Een jsut not being tech support?
From Vickie Kline to All panelists and other attendees: (02:44 PM)
As a librarian not formally trained in ID, I think a good entry point for exploring is Universal Design for Learning. We also need to pay attention to creating accessibility materials…
From Heather Quintero to All panelists and other attendees: (02:45 PM)
I always start with ADDIE… I am formally trained in ID and am an IT trainer for librarians. ADDIE is a framework for every class I make for both live and online classes. Don’t disregard ADDIE.
From Allison Rand to All panelists and other attendees: (02:47 PM)
The Wiggins and McTighe is a great book!
From Roberta (Robin) Sullivan to All panelists and other attendees: (02:53 PM)
@Rachel, Peggy, Shane – an open source course is available. Check out the SUNY’s Quality by Design (QbD): Strategies for Effective Teaching and Quality Course Design at: http://suny.edu/qbd This course is available as a facilitated version at least once each semester and as a self-paced non-facilitated version in Blackboard’s CourseSites. After completing the course requirements you can earn a Digital Badge to show your accomplishment.
From Naomi Toftness to All panelists and other attendees: (02:55 PM)
Just heard the terms “deliberate innovation” vs. “desperate innovation” that totally speaks to my situation with wanting to adopt the new cool tech
++++++++++++++++++++++ SESSION LINK – https://sas.elluminate.com/d.jnlp?sid=2008350&password=LIB2019IDPart7 — If the session link doesn’t work for you, please copy and paste into your browser.
Session Title: Gamifying Instruction: Breakouts and Badges!
Your Name and Title: Dr. Brenda Boyer, Librarian & Instructor
Your Library, School, or Organization Name: Kutztown Sr. High School, Rutgers University
Your Twitter Handle (@name): @bsboyer
Name(s) of Co-Presenter(s): Brenda Boyer
Area of the World from Which You Will Present: Kutztown, PA
Language in Which You Will Present: English
Target Audience: Instructional Design Librarians
Short Session Description: Build engagement for your online library instruction using LMS features, Breakout boxes, and digital badges.
Session Strand (use the “tag”): {Session Strand (use the “tag”):}
Full Session Description: It’s time to amp up your library instruction! Gamifying instruction in research skills such as database usage, advanced searching, & more can increase engagement and drive independent learning for students of all ages. This session will describe how learning management system (LMS) features can be combined with digital microcredentials (i.e. badges) and breakout boxes to gamify instruction that can be otherwise deemed boring (for both the learners and the librarian!).
Link to Conference Site Session Proposal (full URL with http://):https://www.library20.com/forum/topics/gamifying-instruction-breakouts-and-badges
Other Websites / URLs Associated with Your Session:
Your Bio: Dr. Brenda Boyer is a librarian and instructional designer. She has developed online instruction for secondary learners in the Kutztown (PA) School District, as well as for graduate and professional development learners at Wilson College and Rutgers University. She designed and instructs the Rutgers graduate course, Learning Theory, Inquiry, & Instructional Design, and is a frequent presenter at AASL, Internet@Schools. She has published articles in School Library Journal, Teacher Librarian, and School Library Connection.
are we getting the job done, is our instruction sticking, what evidence we do have?
differentiate: who is ready to do what” at what skill level? how to bring everybody up to speed?
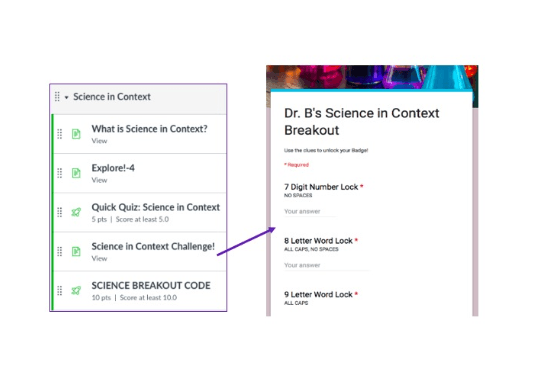
3 elements of Digital Gamification: leverage LMS (set game levels); how digital badges are paired 3. using digital breakout boxes to push challenge, skills
each chat as prerequisite for the next. prerequisite in LMS. Each game level is module. completed with a quizz. if they pass the quiz, opens challenge.1. what is page (facts about a tool to learn about[ what the tool does, feature, etc.) 2. suppe rshort video tour (3 min max), talk about something unique 3. quick quiz (max 5 q/s from the intro page and video). pass the quiz (100 %) to unlock the challenge level. 4. challenge level. digital breakout box embedded in the LMS. breakout using Google Forms. various locks (words, letter, numbers)
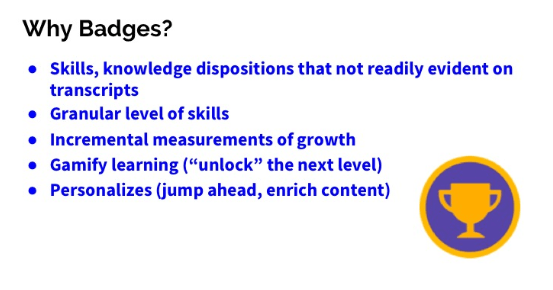
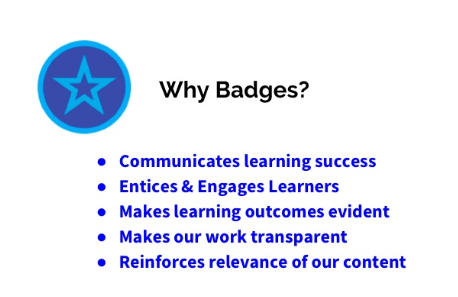
Badges why?
Badgr, Credly, iDoceo
Breakout Boxes
++++++++++++++++++++++
SESSION LINK – https://sas.elluminate.com/d.jnlp?sid=2008350&password=LIB2019IDPart8 — If the session link doesn’t work for you, please copy and paste into your browser. Session Title: Improving Library Tutorials: The Multimedia Design Principles
Your Name and Title: Darlene Aguilar, Instructional Design Librarian
Your Library, School, or Organization Name: Loyola Marymount University
Your Twitter Handle (@name): @DarleneA_ID
Name(s) of Co-Presenter(s):
Area of the World from Which You Will Present: Los Angeles, CA
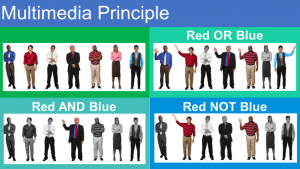
Short Session Description: This session will review Mayer’s (2001) Multimedia Design Principles to help improve instructional modules, tutorials, and videos.
Session Strand (use the “tag”): {Session Strand (use the “tag”):}
Full Session Description: Librarians are creating more online modules, videos, and tutorials to teach information literacy skills. Whether designing instruction online or in-person, research-based instructional methods are required and learning Mayer’s Multimedia Design Principles is the best place to start. In this session, I will review essential prior-knowledge on image types and working memory. I will then show learners how to minimize cognitive overload using these 12 principles: multimedia, spatial contiguity, temporal contiguity, coherence, modality, redundancy, individual differences, signaling, pacing, concepts first, personalization, and human voice.
Link to Conference Site Session Proposal (full URL with http://):https://www.library20.com/forum/topics/improving-library-tutorials-the-multimedia-design-principles
Other Websites / URLs Associated with Your Session:https://linkedin.com/in/darlene-aguilar/
Your Bio: Darlene Aguilar is an Instructional Design Librarian at Loyola Marymount University where she designs and develops video tutorials and online modules on information literacy and library related topics. Additionally, she provides “best practices” training in instructional design to other LMU librarians. She graduated from the University of Southern California with a Master’s in Education for Learning Design and Technology and previously worked at LAUSD for 7 years. She strives to remove learning barriers that are embedded in instruction and curriculum and make learning accessible to all learners.
Explore the principles of designing virtual reality (VR) content and how to use Adobe creative tools to create impactful VR experiences. Then learn how to apply your new digital skills to integrate VR projects into your curriculum.
Designing VR content encourages students to express their ideas through an engaging and innovative digital format. VR projects can be used effectively in all subject areas, allowing students to improve their communication skills and digital literacy while learning key content objectives.
What will I learn?
How using virtual reality projects in your curriculum can produce positive outcomes for you and your students
Best practices and principles for creating amazing virtual reality experiences
The technical skills to create your own virtual reality with Adobe tools (with support from expert digital media educators)
How to apply your new skills to integrate virtual reality projects into your curriculum
Collaborate with educators from around the world
Who is this course for?
This course is aimed at all educators working in primary, secondary or higher education. No prior experience with Adobe tools or digital media technologies is required.
How long is the course?
The course runs for two weeks, starting on 1st October 2018, and should take about 10 hours to complete. All coursework must be submitted by 26th October 2018.
What will it cost?
Enrollment and course completion certificate are FREE!
After successfully completing this course, you will receive a digital badge and course certificate that states that you have completed 10 hours of professional development.
About Adobe Education Exchange Courses
Each week of an Education Exchange collaborative course includes:
Design and instructional theory content, innovative and tailored for educators
Interactive live class session taught by expert educators and featuring guest industry experts
Hands-on creative assignment with personalized feedback from instructors and other educators
Reflective learning journal best practice
Community collaboration and discussion
Live Class Information
This course will include two live classes, which take place on the following days:
Class 1 on Wednesday October 3rd, 2018
Class 2 on Wednesday October 10th, 2018
Each class will take place three times; once in each of the following time zones:
AEST/AEDT (Sydney) from 7pm – 8pm
BST (London) from 7pm – 8pm
CDT (Chicago) from 7pm – 8pm
If you can’t make the live classes for whatever reason, don’t worry – all three iterations of each live class will be recorded and available to view here.
Design Basic Social Media Images Quickly With Pablo
Pablo by Buffer is a no-frills online image editor that lets you make basic social media images in seconds. So while it doesn’t have some of the features of other image editors on this list, it works in a pinch. This tool is free to use without registration, making it perfect for when you or your team needs to create a quick image. My note: not on mobiles yet, only desktop
Design Automatically Resizable Social Media Images With Snappa
Snappa is a user-friendly online image maker that has templates for every social media network. In addition to social post templates, it offers banner, story, and infographic templates. This makes Snappa your one-stop shop for creating all sorts of social media content.
Add Simple Data Visualization Charts to Social Media Images in CanvaCanva is a free online image editor with a huge library of free templates and royalty-free images. The app has built-in templates for all of the major social networks, and you can even post directly to your social media accounts from the app.
use storytelling to shape students’ learning experience, create connections across content areas
brain research suggests when students have an opportunity to retrieve information, rehearse, interleave concepts, and make connections, this promotes memory making and forgetting is less likely to occur.
Adobe Spark is a suite of free tools for creating images, videos, and simple web pages. Key features of Adobe Spark’s web app include an integrated Creative Commons image search tool, the option to download images as JPEGs, and the option to download your videos as MP4 files
Sharalike is a good option to consider when you want to create an audio slideshow. To create an audio slideshow on Sharalike simply import some images from your computer, your Android device or from your iPad, drag them into the sequence in which you want them to appear, and then add some music. Sharalike offers a small collection of stock music that you can use or you can upload your own music.
PowToon is a popular tool for creating animated videos online. PowToon provides a drag-and-drop editor for creating animated videos. The videos that you create feature digital paper cut-outs on a colorful background. Think of PowToon as an online tool for creating videos in the style made popular by Common Craft. PowToon provides drawings of people and objects that you can arrange on blank canvas. After adding your narration to the arrangement you can publish your video.
Magisto is a video creation tool that allows you to quickly drag videos and images from your desktop and or Google Drive account to your Magisto account. After you’ve uploaded the media that you want mixed, select a theme and music for your video.From the video clips and images that you upload, Magisto will select the best portions to remix and blend together. Magisto creates your video after you’ve completed the steps of uploading media, selecting a theme, and choosing music. The final video is emailed to you. In addition to the web-based service Magisto offers a Chrome app, an Android app, and an iPad app.
Chrome app called CaptureCast. CaptureCast, produced by Cattura Video, allows you to record the screen on your Chromebook as well as input from your webcam. To record a video with the webcam on your Chromebook open CaptureCast in your browser then allow it to access your webcam and microphone. You can specify how high of a resolution you would like to use to capture your video. You can also choose your audio quality. If you have an external microphone connected to your Chromebook, make sure that you have it enabled before you start recording. When you have finished recording in CaptureCast you can save your video on your Chromebook or upload it to YouTube, to Vimeo, or to Google Drive.
imbus Screenshot is a tool for creating screencast videos on Chromebooks. It is easy to install, includes customizable countdown timer, and offers multiple ways to save and share your videos. Screencasts recorded with Nimbus Screenshot can be saved to your local drive or to an online Nimbus account. I chose to save to my local drive then upload to my YouTube channel. You could also save to your local drive then share to Google Drive or another online storage service.
+++++++++++++++++++
more on video editing in this IMS blog https://blog.stcloudstate.edu/ims?s=video+editing
Adobe Spark Video is an elegant, easy-to-use tool for creating animated videos that tell a story. It’s available as a browser-based cloud app or as an iOS app. You can get it as a single app or install the 3-in-1 tool to access the Spark Post and Spark Page companion apps too.
What’s great about Spark Video is that it’s quick. You can create a compelling animated video story in just minutes without any design experience, and work on your project from anywhere. As a cloud-based tool, your progress is saved and synced automatically, so you can work on it on mobile or desktop whenever creative inspiration strikes.
Animoto
Now let’s look at a tool that’s similar to Adobe Spark, but gives you more flexibility over your content. Animoto is an affordable, cloud-based tool that offers an assortment of choices and customizations to create a one-of-a-kind video to tell your brand’s story.
This tool gives you a little more control than Adobe Spark Video. You can start with a blank canvas (choosing your own colors, styles, and frames to more closely match your brand) or adapt one of the tool’s wide variety of templates.
YouTube Director
YouTube Director is a revolutionary tool to create video ads for business. Geared toward small local businesses, it’s a foolproof way to tell a compelling story in a short format.
As you follow the prompts, you’re guided to capture images, video, and voiceovers. Then you can post the video and run a video ad campaign on YouTube.
The EDUCAUSE XR (Extended Reality) Community Group Listserv <XR@LISTSERV.EDUCAUSE.EDU>
Greetings to you all! Presently, I am undertaking a masters course in “Instruction Design and Technology” which has two components: Coursework and Research. For my research, I would like to pursue it in the field of Augmented Reality (AR) and Mobile Learning. I am thinking of an idea that could lead to collaboration among students and directly translate into enhanced learning for students while using an AR application. However, I am having a problem with coming up with an application because I don’t have any computing background. This, in turn, is affecting my ability to come up with a good research topic.
I teach gross anatomy and histology to many students of health sciences at Mbarara University, and this is where I feel I could make a contribution to learning anatomy using AR since almost all students own smartphones. I, therefore, kindly request you to let me know which of the freely-available AR app authoring tools could help me in this regard. In addition, I request for your suggestions regarding which research area(s) I should pursue in order to come up with a good research topic.
Hoping to hear from you soon.
Grace Muwanga Department of Anatomy Mbarara University Uganda (East Africa)
One limitation with Spark and Snap is that file sizes need to be small.
If you’re interested in creating AR experiences that work directly in a web browser and are up for writing some markup code, look at A-Frame AR https://aframe.io/blog/webxr-ar-module/.
For finding and hosting 3D models you can look at Sketchfab and Google Poly. I think both have many examples of anatomy.
I’ve been using Roar. They have a 99$ a year license.
++++++++++++
I have recently been experimenting with an AR development tool called Zappar, which I like because the end users do not have to download an app to view the AR content. Codes can be scanned either with the Zappar app or at web.zappar.com.
From a development standpoint, Zappar has an easy to use drag-and-drop interface called ZapWorks Designer that will help you build basic AR experiences quickly, but for a more complicated, more interactive use case such as learning anatomy, you will probably need ZapWorks Studio, which will have much more of a learning curve. The Hobby (non-commercial) license is free if you are interested in trying it out.
You can check out an AR anatomy mini-lesson with models of the human brain, liver, and heart using ZapWorks here: https://www.zappar.com/campaigns/secrets-human-body/. Even if you choose to go with a different development tool, this example might help nail down ideas for your own project.
Hope this helps,
Brighten
Brighten Jelke Academic Assistant for Virtual Technology Lake Forest College bjelke@lakeforest.edu Office: DO 233 | Phone: 847-735-5168